


Changing your name on Facebook can be a simple process, but it’s important to know the steps involved to avoid any confusion or complications.
Whether you’re getting married, going through a legal name change, or simply want to switch up your online identity, Facebook allows you to change your name as long as you follow their guidelines, but how to change your name on Facebook?
To change your name on Facebook, you’ll need to log into your account and navigate to the settings section.
From there, you can select the “Name” option and enter your new name.
It’s important to note that Facebook has certain restrictions on what types of names are allowed, so make sure your new name follows their guidelines to avoid any issues.
If you’re having trouble changing your name on Facebook, don’t worry – there are resources available to help.
Facebook’s Help Center provides step-by-step instructions on how to change your name, and you can also reach out to their support team if you need further assistance.
With a little patience and attention to detail, you can successfully change your name on Facebook and update your online presence.
Post Contents
- 1 Understanding Facebook’s Naming Policy
- 2 Accessing Facebook Settings
- 3 How to Change Your Name on Facebook
- 4 Adding a Nickname or Professional Name
- 5 Changing Your Facebook Username
- 6 Editing Your Profile Picture and About Section
- 7 Changing Your Page Name
- 8 Linking Facebook and Instagram
- 9 Troubleshooting and Additional Tips
- 10 Key Takeaways
Understanding Facebook’s Naming Policy
When it comes to changing your name on Facebook, it’s important to understand the social media giant’s naming policy.
Facebook has strict guidelines in place to ensure that users are using their legal names and not impersonating others.
Here’s what you need to know:
- Legal name: Facebook requires users to use their legal names on their profiles. This means that you cannot use a fake name or a name that is not your own. If you need to change your name on Facebook to reflect a legal name change, you will need to provide documentation to verify your new name.
- Maiden names: Facebook allows users to include their maiden names on their profiles in addition to their legal names. This is helpful for users who have changed their last names due to marriage or other reasons.
- Titles: Facebook does not allow users to include titles in their names unless they are professional titles such as Dr. or Professor. This means that you cannot use titles such as Mr., Mrs., or Miss in your name.
- Symbols, numbers, and punctuation: Facebook does not allow users to include symbols, numbers, or excessive punctuation in their names. However, you can use a single apostrophe or hyphen if it is part of your legal name.
- Suggestive words: Facebook does not allow users to include suggestive words in their names. This means that you cannot use words that are offensive or inappropriate.
- Impersonation: Facebook does not allow users to impersonate others on the platform. This means that you cannot use someone else’s name or pretend to be someone you are not.
- Username requirements: In addition to your name, Facebook also allows you to create a username for your profile. Your username must be alphanumeric (letters and numbers only) and cannot include symbols or punctuation.
By following these guidelines, you can ensure that your name on Facebook is accurate and reflects your true identity.
Accessing Facebook Settings
Changing your name on Facebook is a simple process that can be done through your account settings.
To access your account settings, follow these steps:
- Log in to your Facebook account on your computer or mobile device.
- Click on your profile icon located in the top right corner of the screen.
- Select “Settings & Privacy” from the drop-down menu.
- Click on “Settings” to access your account settings.
Once you have accessed your account settings, you can proceed to change your name on Facebook.
The steps for changing your name will vary depending on whether you are using a computer or a mobile device.
If you are using a computer, follow these steps:
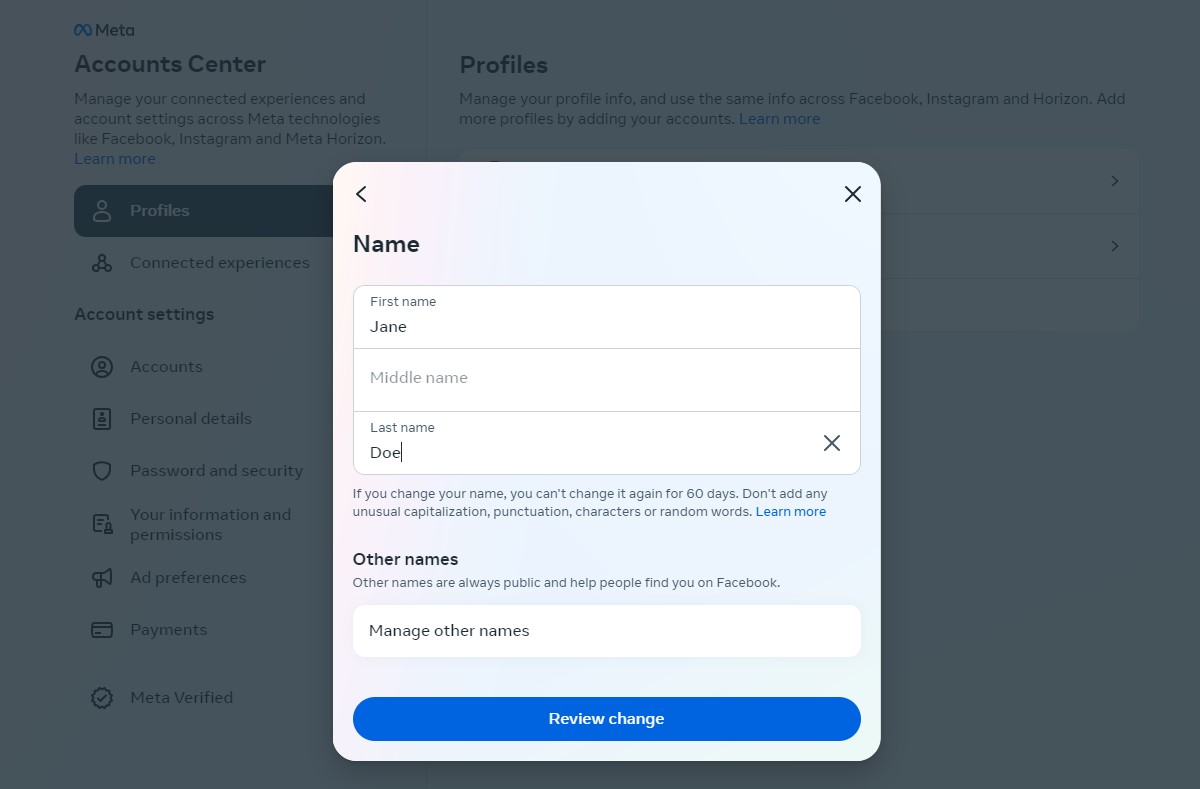
- Click on “Name” under the “General” tab.
- Enter your new name in the fields provided.
- Click “Review Change” to ensure that your new name meets Facebook’s name standards.
- Enter your password to confirm the change.
If you are using the Facebook app on your mobile device, follow these steps:
- Tap on the three horizontal lines located in the bottom right corner of the screen.
- Scroll down and tap on “Settings & Privacy.”
- Tap on “Settings.”
- Tap on “Personal Information.”
- Tap on “Name.”
- Enter your new name in the fields provided.
- Tap “Review Change” to ensure that your new name meets Facebook’s name standards.
- Enter your password to confirm the change.
It’s important to note that changing your name on Facebook may take up to 24 hours to take effect.
Additionally, Facebook has specific guidelines for names, so be sure to review them before changing your name to ensure that your new name meets their standards.
How to Change Your Name on Facebook
If you want to change your name on Facebook, it’s a straightforward process that you can do in just a few steps.
Here’s how to do it:
- First, log in to your Facebook account and go to your profile page.
- Click on your profile picture in the top right corner of the page and select “Settings & privacy” from the dropdown menu.
- From the settings page, click on “Settings” again.
- Click on “Name” and enter your new name in the provided fields.
- Click on “Review change” to see how your new name will appear on Facebook.
- Enter your password and click on “Save changes” to confirm the name change.
It’s important to note that Facebook has certain name standards that you must follow.
Your name should be your real name, not a fake name or a nickname.
If you’re an official representative of a brand or organization, you can use the organization’s name as your profile name.
Also, keep in mind that Facebook only allows you to change your name every 60 days.
So, make sure you’re happy with your new name before you save changes.
If you’re having trouble changing your name, you can fill out a form to let Facebook know.
Additionally, if you want to change your Facebook profile name, you can do so by following the same steps outlined above.
Adding a Nickname or Professional Name
If you have a nickname or professional name that you want to display on your Facebook profile, you can easily add it to your account.
This feature is useful if you go by a different name than your legal name, or if you want to display your professional name on your profile.
Here’s how to add a nickname or professional name on Facebook:
- Click on your profile picture in the top right corner of Facebook.
- Select “Edit Profile” from the dropdown menu.
- Scroll down to the “Details About You” section and click “Add a nickname, a birth name, or other name.”
- Select the type of name you want to add from the dropdown menu. You can choose from “Nickname,” “Maiden Name,” “Alternate Spellings,” and more.
- Enter your other name in the text field.
- Check the box next to “Show at top of profile” if you want your other name to be displayed next to your full name at the top of your profile.
- Click “Save” to save your changes.
It’s important to note that adding a nickname or professional name on Facebook will not change your legal name on the platform.
You can only change your legal name every 60 days.
Additionally, if you want to display your name in multiple languages, you can add your name in each language you want to display it in.
Changing Your Facebook Username
If you want to change your Facebook username, you can do so by following these simple steps:
- Log in to your Facebook account and click on the down arrow located at the top right corner of the page.
- Select “Settings & Privacy” and then click on “Settings.”
- On the left-hand side, click on “General” and then click on “Username.”
- Enter your desired username, making sure to use only alphanumeric characters and periods. You can only change your username once, so choose wisely.
- Once you’ve entered your desired username, click on “Check Availability” to see if it’s available.
- If the username is available, click on “Confirm” to save the changes.
It’s important to note that your Facebook username will also serve as your Facebook URL or web address.
So, if your current username is “JohnDoe123” and you change it to “JohnDoe456,” your Facebook URL will also change from “facebook.com/JohnDoe123” to “facebook.com/JohnDoe456.”
Changing your Facebook username is a simple process that can be done in a matter of minutes.
Just remember to choose a username that you’ll be happy with in the long run since you can only change it once.
Editing Your Profile Picture and About Section
Your Facebook profile picture and About section are the first things people see when they visit your profile. It’s important to keep them up to date and accurate.
Here’s how you can edit them:
Editing Your Profile Picture
To change your profile picture on Facebook, follow these steps:
- Click on your current profile picture.
- Select “Edit Profile Picture.”
- Choose whether you want to upload a new photo or select one from your existing photos.
- Crop or resize the photo as necessary.
- Click “Save.”
Your new profile picture will now be visible to your friends and followers.
Editing Your About Section
Your About section is where you can provide details about yourself, such as your work and education history, contact information, and interests.
To edit your About section, follow these steps:
- Click on your profile picture.
- Click on “About” in the menu below your profile picture.
- Click on the section you want to edit, such as “Work and Education” or “Contact and Basic Info.”
- Click “Edit” to make changes to that section.
- Save your changes by clicking “Save.”
Make sure to keep your About section up to date with accurate and relevant information about yourself.
This will help people get to know you better and connect with you on Facebook.
Changing Your Page Name
If you have a Facebook page and want to change its name, you can do so in just a few simple steps.
However, there are some important things to keep in mind before you make any changes to your page’s name.
Firstly, you need to make sure that you have the necessary permissions to change your page’s name.
Only page admins and editors can change the page name, so if you don’t have these permissions, you won’t be able to change the name.
To change your page’s name, log in to Facebook on your desktop and go to your page.
On the left-hand sidebar menu, scroll down and click on “Edit Page Info”.
The first text box under the “General” section is where you can change your page name.
When you enter your new page name, make sure it complies with Facebook’s page name standards.
If your name change doesn’t comply with these standards, your request will be rejected.
Once you’ve entered your new page name, click “Continue” and then “Request Change”.
You’ll be asked to enter your password to confirm the change.
Once you’ve submitted your request, it will be reviewed by the Facebook team.
It’s important to note that changing your page’s name may affect its visibility and engagement.
If your page has a large following, changing the name could cause confusion and lead to a drop in engagement.
If you’re not sure whether changing your page’s name is the right move, you can always unpublish the page temporarily to see how it affects your audience.
Linking Facebook and Instagram
Linking your Facebook and Instagram accounts can be a great way to increase your social media presence and reach more people.
By doing so, you can share your posts on both platforms simultaneously, saving you time and effort.
Here’s how you can link your Facebook and Instagram accounts:
- Open your Instagram app and go to your profile.
- Tap the three horizontal lines in the top right corner.
- Select “Settings” at the bottom of the screen.
- Tap “Account” and then “Linked Accounts.”
- Select “Facebook” and enter your Facebook login information.
- Once you’ve logged in, you can choose which Facebook page you want to link to your Instagram account.
Once your accounts are linked, you’ll have the option to share a post to Facebook from the same screen where you add a caption.
You can also choose to automatically share your Instagram posts to your linked Facebook page by turning on the “Share Your Story to Facebook” option.
It’s important to note that if you’re an admin of a Facebook page, you can only link your Instagram account to one Facebook page at a time.
Additionally, if you have a business account on Instagram, you can link to a Facebook page that you’re an admin of, but not a personal profile.
Troubleshooting and Additional Tips
If you’re having trouble changing your name on Facebook, don’t worry.
Here are some common issues and additional tips to help you troubleshoot the problem:
Name Policy
Make sure your new name follows Facebook’s name policy.
If your name doesn’t meet the requirements, you won’t be able to change it.
Facebook’s name policy requires you to use your real name, and you can’t use symbols, numbers, or punctuation marks.
You also can’t use a name that includes a title, like “Dr.” or “Sir.”
Passport Name
If you’re trying to change your name to match your passport, keep in mind that Facebook may require additional verification.
You may need to provide a copy of your passport or other identification to prove your identity.
Mobile Device
If you’re using a mobile device to change your name, make sure you have the latest version of the Facebook app installed.
If you’re still having trouble, try logging in to Facebook on a computer and changing your name from there.
Name Change Limit
Remember that you can only change your name on Facebook every 60 days.
If you’ve recently changed your name, you’ll need to wait before you can change it again.
Phone Number
If you’re having trouble changing your name on Facebook and you’ve recently changed your phone number, make sure your new phone number is updated on your Facebook account.
Facebook may use your phone number to verify your identity when you try to change your name.
These are just a few tips to help troubleshoot any issues you may encounter when changing your name on Facebook.
If you’re still having trouble, you can contact Facebook support for further assistance.
Key Takeaways
Changing your name on Facebook is a straightforward process that can be done using either your computer or iPhone.
Here are the key takeaways to keep in mind when changing your name on Facebook:
- Ensure that you’re using your real name as Facebook requires users to use their real names for safety and verification purposes. Avoid using nicknames, fake names, or any other pseudonyms.
- If you’ve recently gotten married or divorced, you can change your name on Facebook to reflect your new marital status. You can also change your name if you’ve legally changed it for other reasons.
- To change your name on Facebook using your computer, go to your profile and click on the “About” section. Then click on “Details About You” and select “Name.” Enter your new name and click on “Review Change.” Review the changes and click on “Save Changes” to confirm.
- To change your name on Facebook using your iPhone, open the Facebook app and tap on the three horizontal lines in the bottom-right corner. Then tap on your name and select “Edit Profile.” Tap on “Name” and enter your new name. Tap on “Review Change” and then “Save Changes” to confirm.
- Facebook may ask you to provide additional information or documentation to verify your name change. This can include a government-issued ID, marriage certificate, or other legal documents.
- Your new name will appear on your Facebook profile, as well as in any posts, comments, or messages you send on the platform. However, it may take some time for your new name to appear in search results or for others to see the change.
Overall, changing your name on Facebook is a simple process that can be done in just a few steps.
Just remember to use your real name and be prepared to provide additional information to verify your name change if requested by Facebook.