


Are you looking at how to delete Facebook account?
Whether you’re taking a break from social media, concerned about privacy, or simply tired of the platform, deleting your account is a straightforward process.
In this article, we’ll guide you through the steps to permanently delete your Facebook account.
Before we dive into the steps, it’s important to note that deleting your Facebook account is a permanent action.
Once you delete your account, you won’t be able to access it again.
This means you’ll lose all your data, including photos, videos, messages, and other content.
So, if you have any important data on your account, make sure to download a copy before deleting your account.
With that said, let’s get started on how to delete your Facebook account.
Post Contents
- 1 Understanding Facebook Account Settings
- 2 Difference Between Deactivating and Deleting
- 3 How to Deactivate Your Facebook Account
- 4 How to Delete Facebook Account Permanently
- 5 Backing Up Your Data Before Deletion
- 6 Understanding What Happens to Your Data After Deletion
- 7 Managing Your Messenger Account
- 8 What Happens to Your Posts and Photos After Deletion
- 9 Memorialize a Deceased Person’s Facebook Account
- 10 Key Takeaways
Understanding Facebook Account Settings
As a Facebook user, you have access to a variety of settings that allow you to customize your account and control your privacy.
In this section, we’ll go over how to access and navigate through your account settings.
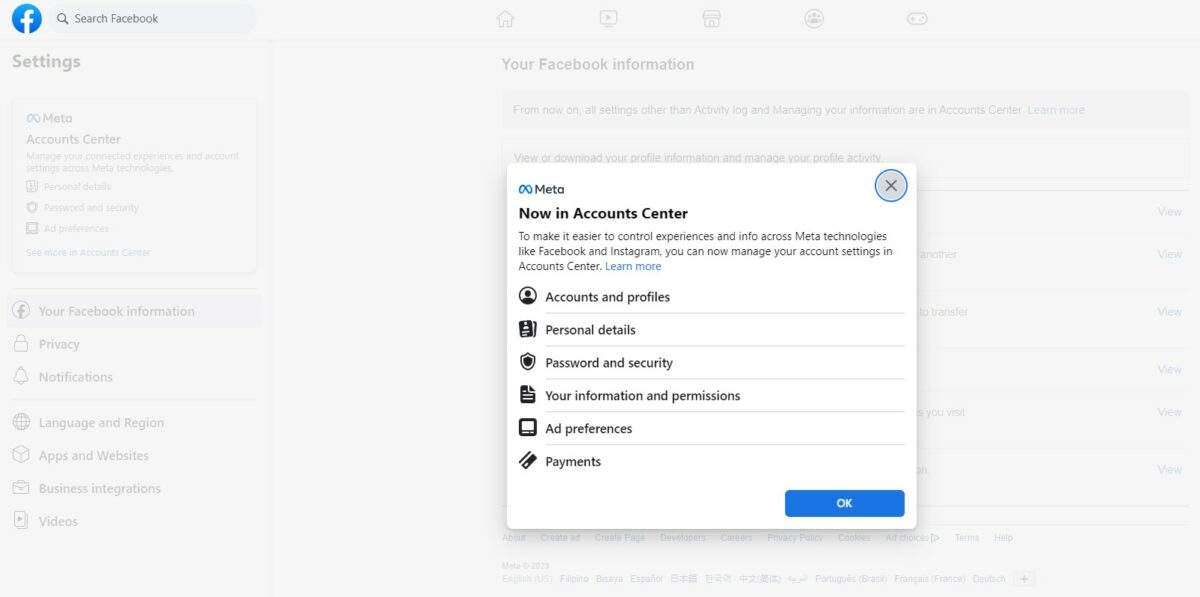
Accessing Account Settings
To access your account settings on Facebook, follow these steps:
- Log in to your Facebook account.
- Click on the downward-facing arrow in the top right corner of the screen.
- Select “Settings & Privacy” from the drop-down menu.
- Click “Settings” to access your account settings.
Once you’re in your account settings, you’ll see a menu on the left-hand side of the screen with various categories of settings.
Here are some of the most important settings categories you should be aware of:
General
Under the “General” category, you can update your name, contact information, and password.
You can also manage your language and notification settings.
Privacy
The “Privacy” category is where you can control who can see your posts, who can send you friend requests, and who can look you up on Facebook.
You can also manage your activity log and block users.
Security
In the “Security” category, you can enable two-factor authentication, choose trusted contacts, and review your login activity.
You can also manage your app passwords and download a copy of your Facebook data.
Your Facebook Information
Under “Your Facebook Information,” you can access and manage your activity log, download your information, and manage your Facebook activity off of Facebook.
Ads
The “Ads” category is where you can control the ads you see on Facebook, manage your ad preferences, and hide ad topics.
By navigating through these settings categories, you can customize your Facebook experience and control your privacy.
Keep in mind that Facebook updates its settings and features regularly, so it’s a good idea to check your settings periodically to make sure they’re up to date.
Difference Between Deactivating and Deleting
If you’re considering taking a break from Facebook or leaving the platform altogether, it’s important to understand the difference between deactivating and deleting your account.
Here’s what you need to know:
What is Deactivation?
Deactivating your account is a temporary measure that allows you to take a break from Facebook without losing all your data.
When you deactivate your account, your profile will no longer be visible to others on the platform.
However, your information, including your photos, posts, and videos, will still be stored on Facebook’s servers.
You can reactivate your account at any time by logging back in.
What is Permanent Deletion?
Deleting your account is a more permanent solution.
When you delete your account, your profile and all associated data will be permanently removed from Facebook’s servers.
This includes your photos, posts, videos, and any other information you’ve shared on the platform.
Once you’ve deleted your account, you won’t be able to reactivate it or retrieve any of your data.
Here’s a quick comparison table to help you decide which option is right for you:
| Deactivation | Permanent Deletion |
|---|---|
| Temporarily removes your profile from Facebook | Permanently removes your profile and data from Facebook |
| Allows you to reactivate your account at any time | Cannot be undone once completed |
| Keeps your data stored on Facebook’s servers | Deletes all of your data from Facebook’s servers |
Keep in mind that it can take up to 90 days for Facebook to fully delete your account and all associated data.
During this time, some information, such as your messages, may still be visible to others on the platform.
Additionally, if you’ve used Facebook to log in to other apps or websites, you may need to create new accounts or profiles after deleting your Facebook account.
How to Deactivate Your Facebook Account
If you’re looking to take a break from Facebook, deactivating your account is a good option.
This will make your profile invisible to other users, but your data will still be saved.
Here’s how you can do it:
Step-by-Step Guide to Deactivate
- Log in to your Facebook account.
- Click on the down arrow located at the top right corner of the screen.
- Select “Settings & Privacy” from the dropdown menu.
- Click on “Settings.”
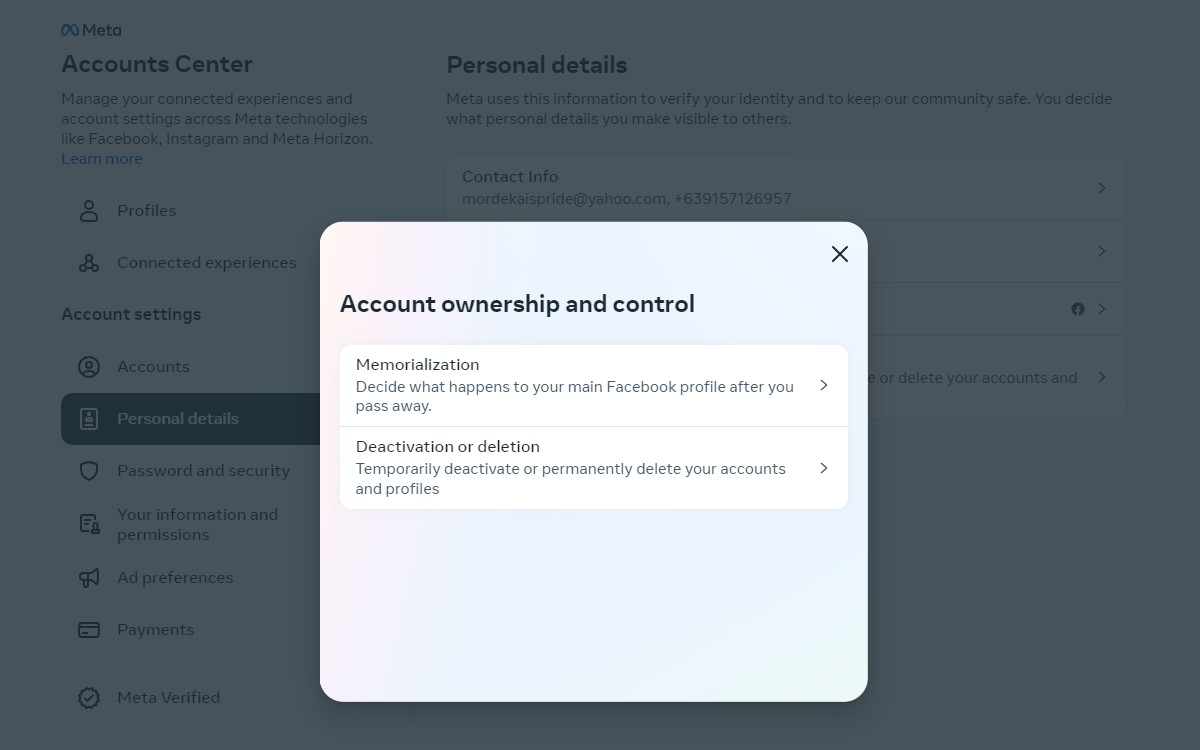
- Scroll down and click on “Your Facebook Information.”
- Click on “Deactivation and Deletion.”
- Select “Deactivate Account” and click “Continue to Account Deactivation.”
- Enter your password and click “Continue.”
Once you’ve completed these steps, your account will be deactivated.
Keep in mind that deactivating your account means that your profile and all your posts, comments, and likes will be hidden from other users.
However, Facebook will still save your data, and you can reactivate your account at any time by logging back in.
If you’re not sure whether you want to permanently delete your account, deactivating it is a great way to take a break from Facebook without losing your data.
How to Delete Facebook Account Permanently
If you have decided to delete your Facebook account, follow the step-by-step guide below for permanent deletion.
Step-by-Step Guide to Permanent Deletion
- Log in to your Facebook account and click on the downward-facing arrow in the top right corner of the screen.
- Select “Settings & Privacy” from the dropdown menu and then click on “Settings.”
- Click on “Your Facebook Information” in the left-hand menu and then select “Deactivation and Deletion.”
- Choose “Permanently Delete Account” and then click on “Continue to Account Deletion.”
- Enter your password and then click on “Continue.”
- Finally, click on “Delete Account” to confirm the permanent deletion of your Facebook account.
It’s important to note that once you delete your Facebook account, it cannot be undone.
All your data, including photos, posts, and messages, will be permanently deleted.
Additionally, you won’t be able to reactivate your account or retrieve any of your data.
Before deleting your Facebook account, make sure to download a copy of your data by clicking on “Download Your Information” in the “Your Facebook Information” section of the settings menu.
This will allow you to keep a copy of your data, including photos and posts, for your own records.
Backing Up Your Data Before Deletion
Before you delete your Facebook account, it’s important to back up your data to ensure that you don’t lose any important information.
Facebook allows you to download a copy of your data, which includes your posts, photos, videos, messages, and more.
Here’s how to do it:
How to Backup Posts and Photos
- Go to your Facebook settings and click on “Your Facebook Information” from the side panel, then select “Download Your Information.”
- Choose the data range and file format (HTML or JSON) for your backup.
- Select the specific data you want to include in your backup, such as posts, photos, videos, and more.
- Click the “Create File” button to download your backup.
How to Backup Messages and Videos
- Go to your Facebook settings and click on “Your Facebook Information” from the side panel, then select “Download Your Information.”
- Choose the data range and file format (HTML or JSON) for your backup.
- Select the specific data you want to include in your backup, such as messages and videos.
- Click the “Create File” button to download your backup.
It’s important to note that your backup may take some time to generate, depending on the amount of data you have on Facebook.
Once your backup is ready, you can save it to your computer or an external hard drive for safekeeping.
By backing up your data before deleting your Facebook account, you can ensure that you don’t lose any important information.
This can be especially important if you have years of memories stored on the platform.
Understanding What Happens to Your Data After Deletion
When you delete your Facebook account, you may wonder what happens to your data.
Here is what you need to know about Facebook’s data retention policy and data privacy after deletion.
Data Retention Policy
According to Facebook’s Help Center, the deletion process itself can be a matter of minutes, but it can take as long as 90 days for the site to totally wipe data of yours that’s been stored.
Facebook says it keeps “backup copies for a reasonable period of time” after a deletion, and it says that can be as long as three months.
It also says it may retain copies of “some material.”
Data Privacy After Deletion
When you delete your Facebook account, it is no longer accessible to other people.
However, Facebook may still retain some data from the account. Some information, such as messaging history, isn’t stored in your account.
This means friends may still have access to messages you sent after your account has been deleted.
It’s important to note that Facebook may also retain some of your personal information, such as your name and email address, even after you delete your account.
This is because Facebook uses this information to help prevent fraud and to improve its services.
Managing Your Messenger Account
If you’re thinking about deleting your Facebook account, you may also want to manage your Messenger account.
Here are some tips on how to do that.
Deleting Messenger After Facebook Account Deletion
If you’ve already deactivated or deleted your Facebook account, you may still have an active Messenger account.
If you want to delete your Messenger account, you can follow these steps:
- Open the Messenger app on your device.
- Tap on your profile picture in the top left corner.
- Scroll down and tap on “Legal and Policies.”
- Tap on “Deactivate Messenger.”
- Enter your password and tap “Continue.”
- Tap “Deactivate.”
Once you’ve deactivated your Messenger account, your messages and conversations will be deleted.
You won’t be able to reactivate your Messenger account, and you’ll need to create a new account if you want to use Messenger again.
Using Messenger Without a Facebook Account
If you want to use Messenger without a Facebook account, you can create a new Messenger account with your phone number.
Here’s how:
- Download the Messenger app on your device.
- Tap on “Create New Account.”
- Enter your phone number and tap “Continue.”
- Enter the verification code that you receive via text message.
- Add your name and a profile picture (optional).
- Start using Messenger!
With a Messenger account, you can send messages, make voice and video calls, and use other Messenger features.
You won’t have access to Facebook features like News Feed, Groups, or Events, but you can still connect with your friends and family through Messenger.
What Happens to Your Posts and Photos After Deletion
When you delete your Facebook account, you may wonder what happens to all your posts and photos.
This section will explain the visibility of deleted posts and access to deleted photos.
Visibility of Deleted Posts
When you delete your Facebook account, your posts will no longer be visible to anyone on the platform.
However, keep in mind that it may take up to 90 days for Facebook to completely remove all your data from their servers.
During this time, your posts may still be visible to some extent.
It’s also important to note that if you’ve shared your posts with others, they may have already saved or copied them.
In this case, you won’t be able to delete those posts from their devices or accounts.
Access to Deleted Photos
Similar to posts, when you delete your Facebook account, your photos will no longer be visible to anyone on the platform.
However, if you’ve shared your photos with others, they may still have access to them.
It’s important to note that Facebook may keep backups of your data for a reasonable period of time after deletion.
This means that your photos may still exist on their servers, but they won’t be visible to anyone.
If you want to ensure that your photos are completely deleted, you should manually delete them before deleting your account.
This way, you can be sure that they won’t be accessible to anyone on the platform or Facebook’s servers.
Memorialize a Deceased Person’s Facebook Account
Losing a loved one is never easy, but Facebook offers a way to honor and remember them by memorializing their account.
This section will guide you through the process of requesting for memorialization and what happens after.
How to Request for Memorialization
To request for memorialization, you need to provide Facebook with proof that your loved one has passed away.
You can submit one of the following documents:
- Obituary
- Memorial card
- Power of attorney
- Birth certificate (in cases where the deceased is a minor)
- Last will and testament
- Estate letter
Make sure that the information on the documentation you provide matches the information on your loved one’s account.
Once you have the necessary documents, follow these steps:
- Go to the Facebook Help Center and click on “Reporting a deceased person’s account” under “Popular Articles.”
- Click on “Memorialize the account” and fill out the required information.
- Upload the proof of death document.
- Click “Send.”
Facebook will review your request and memorialize the account if it is valid.
What Happens After Memorialization
After Facebook memorializes the account, the following changes will occur:
- The word “Remembering” will be shown next to your loved one’s name on their profile.
- The account will no longer appear in public spaces, such as in “People You May Know” suggestions or birthday reminders.
- No one will be able to log in to the account.
- The account will not be able to accept new friend requests.
- The profile and cover photos will be removed, and the account will be locked.
Friends and family can still post on the memorialized account’s timeline, share memories, and photos.
However, the account will not appear in newsfeeds or search results unless the person searching is already a friend of the account owner.
Key Takeaways
If you’re considering deleting your Facebook account, here are a few key takeaways to keep in mind:
- Deactivating your account is not the same as deleting it. Deactivating your account will hide your profile and all your activity on Facebook, but your data will still be stored on their servers. If you want to completely delete your account, you’ll need to follow the steps outlined in the previous section.
- Deleting your Facebook account will also delete any data that Facebook has collected about you, including your photos, posts, and messages. However, it’s important to note that Facebook may still retain some of your data in backup copies for a limited period of time.
- Deleting your Facebook account may affect your ability to use other services that require a Facebook login, such as Spotify or Airbnb. Make sure to check with these services before deleting your account to see if there are any alternative login options available.
- Deleting your Facebook account can be a good way to protect your privacy and reduce your online footprint. However, it’s important to remember that there are many other social media platforms out there that may also be collecting your data. Make sure to review the privacy policies of any platform you use to understand how your data is being used.
Overall, deleting your Facebook account is a personal decision that should be based on your own priorities and concerns.
If you’re ready to take the plunge, make sure to follow the steps outlined in the previous section to ensure that your account is fully deleted.