


Changing your primary email address on LinkedIn is a simple process that can be done in just a few steps.
Whether you have a new email address or simply want to update your primary email, LinkedIn makes it easy to manage your account information, but how to change primary email on LinkedIn?
In this article, we will walk you through the steps to change your primary email on LinkedIn.
To get started, you will need to log in to your LinkedIn account and navigate to your account settings.
From there, you can access your email addresses and update your primary email.
We will provide detailed instructions on how to do this, including screenshots to help guide you through the process.
Whether you are using LinkedIn for job searching, networking, or simply staying connected with colleagues, it is important to keep your account information up to date.
By following these steps, you can ensure that your primary email on LinkedIn is accurate and current.
Post Contents
Understanding Primary Email on LinkedIn
As you may know, your email address is an essential part of your LinkedIn profile.
It serves as your primary means of communication with other professionals on the platform.
In this section, we’ll discuss the importance of your primary email and how it differs from other emails on LinkedIn.
Importance of Primary Email
Your primary email is the email address that LinkedIn uses to communicate with you.
It’s also the email address that other LinkedIn users will see when they view your profile.
Therefore, it’s essential to keep your primary email up-to-date and ensure that it’s a professional email address.
Having a professional email address on LinkedIn is crucial because it shows that you take your professional image seriously.
It also makes it easier for other professionals to contact you and helps to establish trust and credibility.
Primary Email Vs. Other Emails
In addition to your primary email, you can also add other email addresses to your LinkedIn account.
These additional email addresses are known as secondary email addresses.
Secondary email addresses are useful if you have multiple email accounts or if you want to receive LinkedIn notifications on multiple devices.
However, it’s important to note that your secondary email addresses are not visible to other LinkedIn users. Only your primary email address is visible on your profile.
Therefore, it’s crucial to ensure that your primary email address is up-to-date and professional.
To change your primary email address on LinkedIn, simply go to your LinkedIn profile and click on “Me” in the top right corner.
Then, select “Settings & Privacy” from the drop-down menu.
In the “Account” tab, click on “Change” next to the “Email addresses” option.
In conclusion, your primary email address is an essential part of your LinkedIn profile.
It’s the email address that LinkedIn uses to communicate with you and the email address that other professionals will see when they view your profile.
Therefore, it’s crucial to keep your primary email up-to-date and ensure that it’s a professional email address.
How to Change Primary Email on LinkedIn
If you want to change your primary email on LinkedIn, you can do so easily by following the steps below.
Accessing LinkedIn Settings
- Log in to your LinkedIn account.
- Click on your profile picture in the top right corner of the screen.
- Click on “Settings & Privacy” from the dropdown menu.
- On the “Account” tab, click on “Email addresses” option.
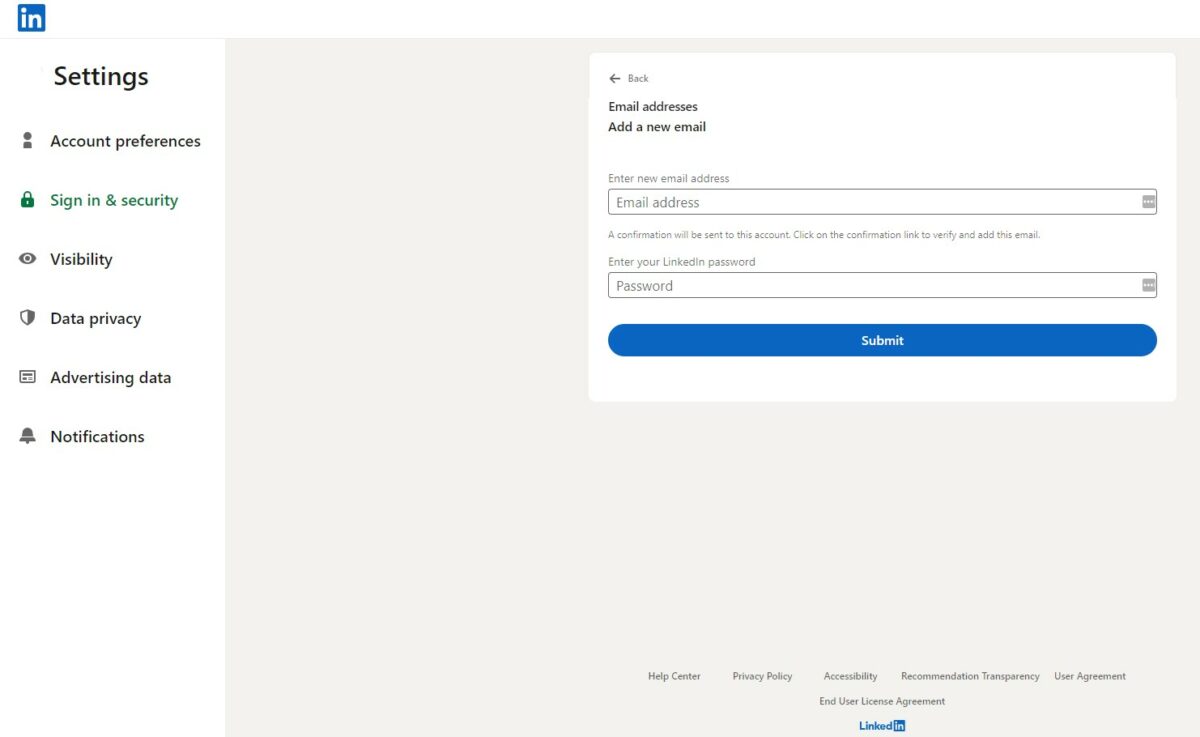
Adding a New Email Address
- Click on “Add email address” button.
- Enter your new email address and your LinkedIn password in the text box.
- Click on “Send verification” button.
- Check your email inbox and click on the verification link.
- Enter your LinkedIn password and click on “Verify” button.
Setting New Email as Primary
- Once your new email address is verified, you can make it your primary email address.
- Click on the “Make primary” button next to your new email address.
- Enter your LinkedIn password and click on “Save” button.
Removing Old Email Address
- If you want to remove your old email address, click on the “Remove” button next to it.
- Enter your LinkedIn password and click on “Save” button.
That’s it!
Your new email address is now your primary email on LinkedIn.
Remember to keep your email address up to date to ensure you receive important notifications and messages from LinkedIn.
Verification Process
Changing your primary email on LinkedIn requires a verification process to ensure that your account remains secure.
This process involves receiving a verification email and confirming your new primary email.
Here’s what you need to know:
Receiving Verification Email
Once you’ve added a new email address to your LinkedIn account, LinkedIn will send a verification email to that address.
This email will contain a verification link that you’ll need to click to confirm your new email address.
If you don’t receive the verification email, check your spam folder or try adding the email address again.
You can also try adding a different email address if you’re having trouble receiving the verification email.
Confirming New Primary Email
After clicking the verification link, you’ll be directed to a confirmation page on LinkedIn’s website.
Here, you’ll need to enter your LinkedIn password to confirm your new primary email address.
If you don’t remember your LinkedIn password, you can reset it by clicking the “Forgot password?” link on the login page.
LinkedIn will send a password reset link to your email address, allowing you to create a new password and continue with the verification process.
Once you’ve confirmed your new primary email address, LinkedIn will send a confirmation email to your new email address.
This email will confirm that your email address has been changed and that your account is now secure.
Remember to keep your email address up to date on LinkedIn to ensure that you receive important notifications and updates.
By following these simple steps, you can easily change your primary email address on LinkedIn and keep your account secure.
Troubleshooting Common Issues
If you encounter any issues while changing your primary email on LinkedIn, don’t worry.
Here are some common issues and how to troubleshoot them.
Email Not Received
If you didn’t receive an email from LinkedIn after changing your email address, try the following:
- Check your spam folder: Sometimes, LinkedIn emails can end up in your spam folder. Check your spam folder and mark the email as “not spam” if it’s there.
- Wait a few minutes: It may take some time for the email to arrive. Wait a few minutes and check your inbox again.
- Check your email address: Make sure you entered the correct email address. If you entered the wrong email address, LinkedIn won’t be able to send you an email.
Spam Folder Check
If you find the LinkedIn email in your spam folder, follow these steps:
- Move the email to your inbox: Drag the email to your inbox and mark it as “not spam.”
- Add LinkedIn to your contacts: Add LinkedIn to your contacts or safe senders list to ensure that future emails don’t end up in your spam folder.
Resending Verification Email
If you didn’t receive the verification email after changing your primary email, try the following:
- Resend the verification email: Go to your LinkedIn settings and click on “Resend” next to the email address that needs verification. LinkedIn will send you another email.
- Check your email address: Make sure you entered the correct email address. If you entered the wrong email address, LinkedIn won’t be able to send you an email.
By following these troubleshooting steps, you should be able to change your primary email on LinkedIn without any issues.
If you still have problems, you can contact LinkedIn support for further assistance.
Changing Primary Email on LinkedIn Mobile App
If you prefer to use the LinkedIn mobile app, you can also change your primary email address easily.
Here’s how to do it on Android and iOS devices:
Process on Android
- Open the LinkedIn app on your Android device and tap on the “Me” icon located at the bottom right corner of the screen.
- Tap on the gear icon at the top right corner to access your settings.
- Scroll down and tap on “Account Preferences.”
- Tap on “Email Addresses.”
- Tap on the email address that you want to set as your primary email.
- Tap on “Make Primary” and confirm your password when prompted.
Process on iOS
- Open the LinkedIn app on your iOS device and tap on the “Me” icon located at the bottom right corner of the screen.
- Tap on the gear icon at the top right corner to access your settings.
- Scroll down and tap on “Settings.”
- Tap on “Account.”
- Tap on “Email Addresses.”
- Tap on the email address that you want to set as your primary email.
- Tap on “Make Primary” and confirm your password when prompted.
That’s it!
Your primary email address on LinkedIn has been updated.
Keep in mind that changing your primary email address will also affect the email address that LinkedIn uses to communicate with you.
If you have any issues with changing your primary email address on LinkedIn, you can contact LinkedIn’s customer support for assistance.
Maintaining Privacy and Security
When changing your primary email on LinkedIn, it’s important to maintain your privacy and security.
Here are some tips to help you keep your information safe:
Privacy Settings
LinkedIn has several privacy settings that you can use to control who can see your information.
To access these settings, click on “Me” in the top right corner of your LinkedIn homepage, then select “Settings & Privacy” from the dropdown menu.
Under the “Privacy” tab, you can control who can see your activity feed, profile photo, and connections.
You can also adjust your settings for job seeking preferences and data privacy.
Security Measures
To keep your account secure, LinkedIn recommends that you enable two-step verification.
This means that you’ll need to enter a code in addition to your password when you log in from a new device or location.
You can also review your login history to make sure that no one else has accessed your account.
To do this, go to “Settings & Privacy” and click on the “Account” tab. Then, click on “Review all” under “Where you’re signed in.”
Finally, be sure to use a strong and unique password for your LinkedIn account.
Avoid using the same password for multiple accounts, and consider using a password manager to help you keep track of your passwords.
By following these tips, you can help protect your privacy and security when changing your primary email on LinkedIn.
Key Takeaways
Changing your primary email on LinkedIn is a simple process that can be done in a few steps.
Here are some key takeaways to keep in mind:
- Your primary email address can only be replaced with a verified email address.
- You can add and confirm or remove an email address from your mobile browser by clicking the “Me” icon at the top of your LinkedIn page and selecting “Settings & Privacy” from the drop-down menu.
- To change your primary email address on LinkedIn, go to your LinkedIn profile, click on “Me” in the top right corner, and select “Settings & Privacy” from the drop-down menu. Then, in the “Account” tab, click on “Change” next to the “Email addresses” option.
- You can also change your primary email address in Sales Navigator by hovering over your profile picture and selecting “Settings,” then clicking “Manage your LinkedIn settings” and selecting the “Account” tab.
- Once you have added a new email address, you can make it your primary email address by clicking “Make primary” on the relevant email address and entering your LinkedIn password.
- Remember to keep your email address up-to-date on LinkedIn so that you can stay connected with your professional network.
Overall, changing your primary email address on LinkedIn is a quick and easy process that can help you stay connected with other professionals in your network.
By following these steps, you can ensure that your profile information is accurate and up-to-date.