Adding a visual overlay to your OBS streaming setup can add an extra layer of professionalism and polish to your presentation.
Whether you’re creating content on Twitch, YouTube, or any other video platform, having the right graphics in the right places can make a difference.
This blog post will cover how to add overlay to OBS, including the best practices and some tips to get you started!
Post Contents
What Is An Overlay?
An overlay typically refers to a graphical element that has been added on top of your video content.
It could be anything from a logo or branding elements, social media links, text overlays that display information such as your current game mode, or even an image of a character you are playing.
Types Of Overlays
There are several different types of overlays available for OBS, and some of the more popular ones include the following:
Standard Image Overlay
You can add this static image locally or from a URL, and it will appear as part of your scene.
You can use it to add branding elements such as logos or even to show an image of a character you are currently playing.
Webcam Frame Overlay
These overlays usually come in a frame that goes around your webcam feed.
You can use this to add extra visual elements, such as borders and textures, that make the overall look more professional.
Follower / Subscriber Alerts
These alerts appear when someone new follows or subscribes to your channel. This can be set up with either Streamlabs OBS or a third-party app.
Donation Overlay
These overlays appear when someone donates to your channel. Again, these can be set up with Streamlabs OBS or with a third-party app.
Extension Overlay
These are exclusive to Twitch and can be added directly from the site.
You can use this overlay to show a list of active extensions or add other Twitch-specific elements.
You can customize these overlays with different colors, fonts, and sizes. You can also add animations or transitions to make them even more eye-catching.
Why Should I Use an Overlay To OBS?
An overlay can help you create a more professional streaming setup with minimal effort.
Not only do overlays add to the overall aesthetic, but they also provide additional information about your stream that viewers can use for reference.
Here are some of the benefits of using overlays for OBS:
Professionalism And Branding
Adding an overlay to your OBS stream can help give it a more professional look and feel, which can help establish your brand.
Adding visual overlays with logos or branding elements can help reinforce your channel’s identity and make it easier for viewers to recognize you as they browse through various streaming platforms.
Engagement
Using overlays can also help create engagement with your viewers, as they can click on social media links or even donate via Paypal.
You can also add text boxes that give information about a game mode or character you are playing, keeping viewers engaged and entertained.
Increasing Visibility
Adding an overlay to your OBS stream can also increase visibility, making it easier for viewers to find and recognize your channel.
This is especially important when streaming on platforms such as Twitch or YouTube, where thousands of other channels compete for attention.
By having a visually appealing overlay that stands out from the rest, you can help increase your chances of being found and gaining more viewers.
Greate Control
When you use an overlay, you have complete control over the look and feel of your stream.
This means you can change it as often as you like and experiment with different designs to see what works best for you and your channel.
You can also add or remove elements as needed, allowing you to change things up when needed.
With an overlay, you can also make it easier for viewers to find and follow your social media accounts.
This is a great way to encourage more engagement with your brand and boost views on your videos.
How To Add Overlay To OBS
The process for setting up an overlay in OBS will vary depending on your OBS version.
However, the basic principle is the same in all versions; you must first find a suitable image and add it as a source in your OBS scene.
Once you have the image prepared, follow the steps below to add it as a source to your OBS scene:
- Launch OBS Studio and select your desired scene
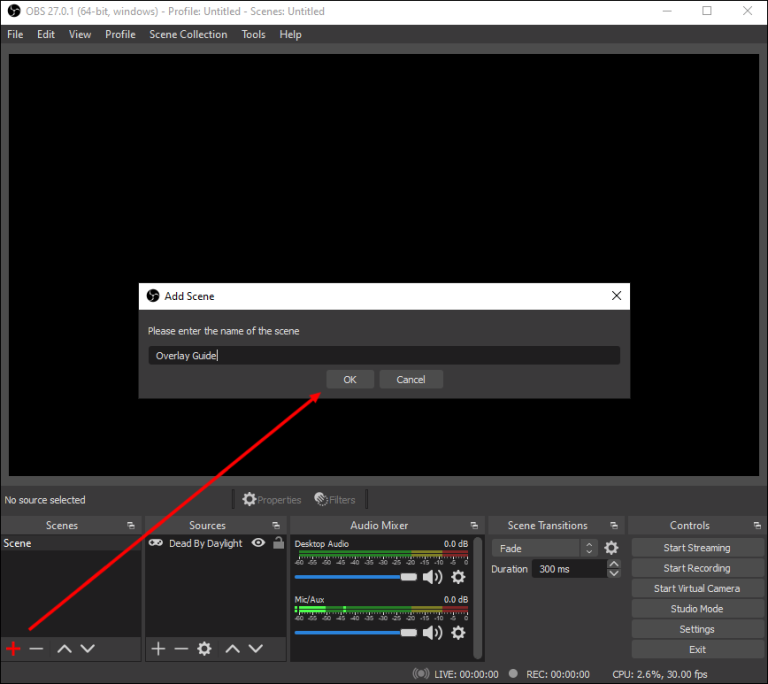
- Click on the “+” icon at the bottom of the “Sources” box
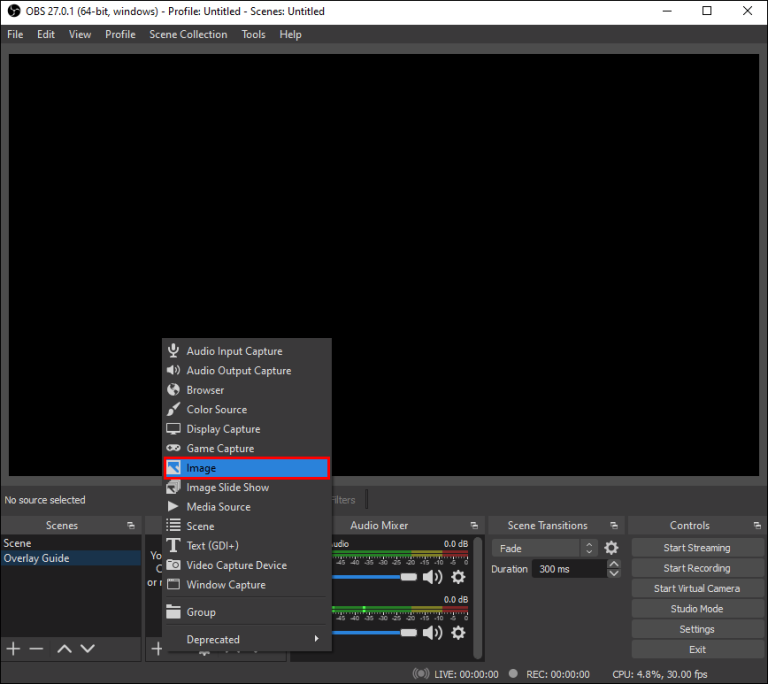
- Select “Image” or “Video” from the list of options
- Enter the title of the stream overlay in the corresponding field
- Select your desired image from its location on your computer
- Resize the overlay with Alt Cropping, if necessary
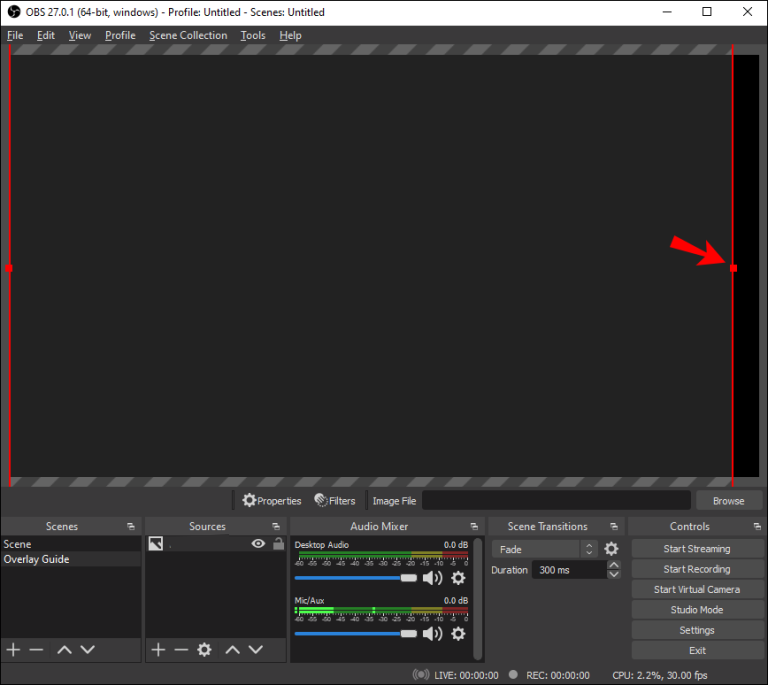
- You can also select other options, such as opacity or duration, from the options available.
- Click “Ok” to save your changes and close the source window
- You should now see the overlay in your OBS scene
Once you have added the overlay to your OBS scene, all that’s left to do is to make sure it looks great and is visible to your viewers.
You may need to adjust the size or opacity of the overlay until you are happy with the final result.
After you set it up to your liking, you can start streaming and enjoy showing off your new professional-looking OBS stream overlay!
Best Practices For Overlays
When creating your OBS overlay, it’s important to keep some best practices in mind:
Keep It Simple
It’s best to stick with a maximum of 3-4 elements in your overlay. Too many elements can look cluttered and make it difficult for viewers to focus on your presentation content.
Keep The Focus On The Content
Make sure your overlay keeps the main focus of your stream, which should always be on the content.
For example, if you are streaming a game, ensure that your overlay elements do not distract from the action.
Be Consistent
As with all branding elements, consistency is key. Try to make sure that your overlay elements match the overall look and feel of your stream and any other branding elements (such as logos, banners, etc.)
Be Creative
Last but not least, be creative and have fun with your overlay! This is your chance to show off your personality and make your stream stand out from the rest.
These are just a few tips to get you started with adding an overlay to OBS, but there are plenty of other online resources if you want to take your streaming setup a step further.
With some practice and creativity, you can create an amazing-looking stream that will keep your viewers coming back for more!
Final Thoughts
Adding an overlay to OBS can be a great way to make your streaming setup more professional and appealing. If done correctly, an overlay can give your stream a unique look and help you stand out from the crowd!
In this guide on how to add overlay to OBS, we’ve gone over the basics of setting up an overlay in OBS.
With practice and creativity, you can create an amazing-looking overlay that will make your stream stand out from the rest.
Just remember to keep it simple and focus on the content so your viewers won’t be distracted by too many elements in your overlay!