


Taking a screenshot on your Acer Chromebook is a simple process that can be done in a few easy steps.
Whether you want to capture an image, a webpage, or a specific part of your screen, your Acer Chromebook has got you covered, but how to screenshot on Acer Chromebook?
In this article, we will show you how to take a screenshot on your Acer Chromebook using different methods.
One of the easiest ways to take a screenshot on your Acer Chromebook is by pressing the Ctrl and the . keys at the same time.
This will capture the entire screen and save it to your device’s Screenshots folder.
However, if you want to capture a specific part of your screen, you can use the Ctrl, Shift, and the . keys instead.
This will allow you to select the portion of the screen you want to capture.
Another way to take a screenshot on your Acer Chromebook is by using the built-in screenshot tool.
This tool can be accessed by clicking on the camera icon in your device’s launcher.
Once you click on the icon, you will be presented with three options: full screen, partial screen, or a specific window.
Select the option that best suits your needs and your screenshot will be saved to your device’s Screenshots folder.
Post Contents
- 1 Understanding Your Acer Chromebook
- 2 How to Screenshot on Acer Chromebook
- 3 How to Take a Full Screenshot
- 4 How to Take a Partial Screenshot
- 5 Using External Keyboard for Screenshots
- 6 Managing Screenshots on Acer Chromebook
- 7 Editing Screenshots on Acer Chromebook
- 8 Troubleshooting Screenshot Issues
- 9 Comparing Acer Chromebook with Other Devices
- 10 Finding the Best Deals for Acer Chromebooks
- 11 Key Takeaways
Understanding Your Acer Chromebook

If you are new to using an Acer Chromebook, it is important to understand the basics of your device.
Here are a few things to keep in mind:
- Chromebook Operating System (Chrome OS): Your Acer Chromebook runs on Chrome OS, a lightweight operating system designed by Google. It is based on the Chrome web browser and is optimized for web-based applications and cloud computing.
- Launcher: The Launcher is the central hub for accessing your apps, settings, and files. You can access it by clicking on the circle icon in the bottom left corner of your screen or by pressing the Search key on your keyboard.
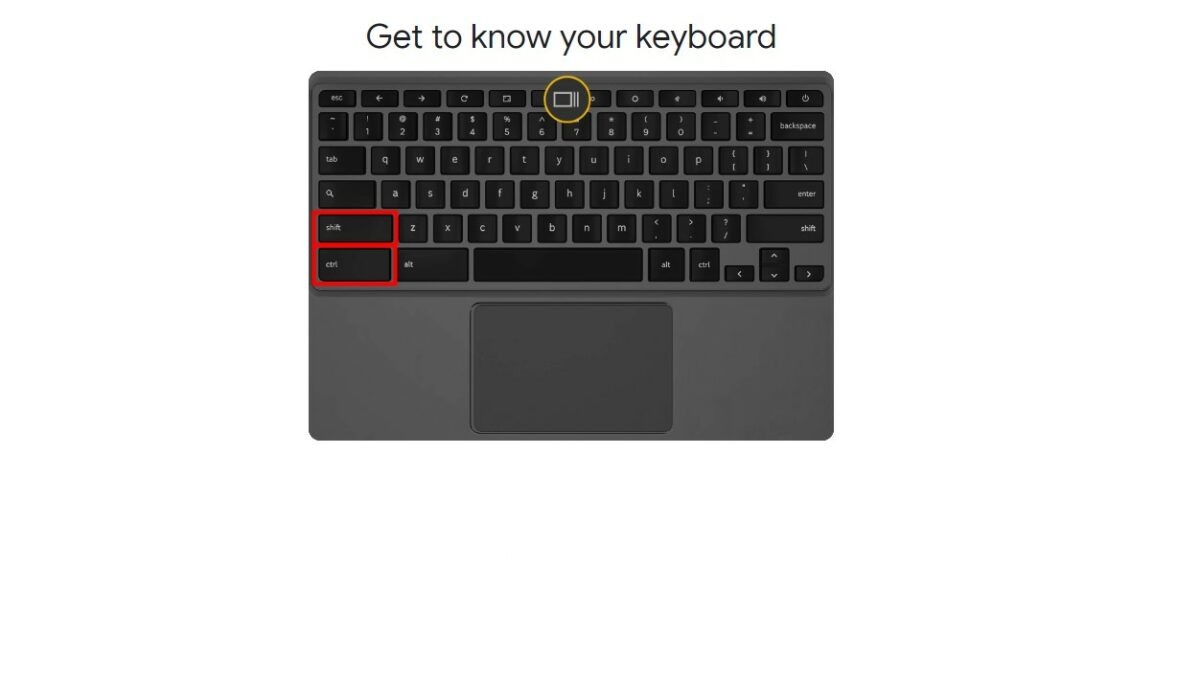
- Keyboard Shortcut for Screenshots: To take a screenshot on your Acer Chromebook, press the Ctrl and the Show Windows keys simultaneously. The Show Windows key is typically located in the top row of your keyboard, near the brightness and volume controls.
- Chromebook Keyboard: The keyboard on your Acer Chromebook may be different from the keyboard on a traditional laptop. For example, there may be some keys missing, or some keys may have different functions. Take some time to familiarize yourself with the keyboard layout and shortcuts.
- Chromebook Settings: To access your Chromebook settings, click on the clock in the bottom right corner of your screen, then click on the gear icon. From here, you can adjust your display settings, sound settings, and more.
Overall, the Acer Chromebook is a user-friendly device that is designed to be easy to use and navigate.
With a little bit of practice, you will be taking screenshots and using your Chromebook like a pro in no time!
How to Screenshot on Acer Chromebook
Taking screenshots on an Acer Chromebook is quick and easy.
You can capture the entire screen, a specific window, or a partial area of the screen.
Full Screen Screenshot
To take a full-screen screenshot on your Acer Chromebook, press the “Ctrl” and “Show Windows” keys at the same time.
The Show Windows key is usually located at the top row of your keyboard and has a square icon with two vertical lines on either side.
The screenshot will be saved to your Downloads folder.
Specific Window Screenshot
If you want to capture a specific window, press the “Ctrl”, “Shift”, and “Show Windows” keys at the same time.
This will take a screenshot of the active window and save it in your Downloads folder.
Partial Area Screenshot
To take a screenshot of a specific area of the screen, press the “Ctrl”, “Shift”, and “P” keys at the same time.
Your cursor will turn into a crosshair.
Click and drag the crosshair to select the area you want to capture.
Once you release the mouse button, the screenshot will be saved to your Downloads folder.
Using Screen Capture Tool
Acer Chromebook also has a built-in screen capture tool that can take both screenshots and video screen recordings.
To access it, press the “Ctrl”, “Shift”, and “Show Windows” keys at the same time.
This will open the Screen Capture tool.
From there, you can choose to capture the entire screen, a specific window, or a partial area of the screen.
Retrieving Screenshots
Once you have taken a screenshot, you can retrieve it from the Downloads folder in your file manager.
You can also access your screenshots by visiting Google’s Take a Screenshot page.
How to Take a Full Screenshot
Taking a full screenshot on your Acer Chromebook is quick and easy.
Here’s how you can do it:
- Locate the content you want to capture on your screen.
- Press the “Ctrl” and “Show Windows” keys simultaneously. The “Show Windows” key is usually located in the top row of your keyboard and looks like a rectangle with two vertical lines on either side.
- A notification will appear in the bottom right corner of your screen, indicating that the screenshot has been saved to your Downloads folder.
Alternatively, you can use the keyboard shortcut “Ctrl + Shift + Show Windows” to take a full screenshot and save it directly to your clipboard.
You can then paste the image into any document or application that accepts images.
It’s important to note that the “Print Screen” key, which is commonly used on Windows computers to take screenshots, does not work on Chromebooks.
Instead, you’ll need to use the “Show Windows” key or the keyboard shortcut mentioned above.
Taking a full screenshot is useful when you want to capture an entire webpage, document, or application window.
It’s a great way to preserve information or share it with others.
With these simple steps, you can take full screenshots on your Acer Chromebook in no time.
How to Take a Partial Screenshot
Taking a partial screenshot on your Acer Chromebook is easy.
This feature comes in handy when you only need to capture a specific area of your screen.
Here’s how to do it:
- Hold down the Ctrl + Shift keys, then press the Show Windows key. The Show Windows key is located in the top row of your keyboard and looks like a rectangle with two vertical lines next to it.
- Your screen will dim, and you’ll see a crosshair cursor. Click and drag the cursor to select the area you want to capture.
- Release the mouse button, and your partial screenshot will be saved to your Downloads folder.
It’s that simple! With just a few clicks, you can capture exactly what you need, without having to crop a full screenshot.
If you’re having trouble finding your partial screenshot, you can also access it from the Downloads folder in your file manager.
Remember that you can also take a full screenshot or capture a specific window using different keyboard shortcuts.
Experiment with these options to find the one that works best for you.
Using External Keyboard for Screenshots
If you prefer using an external keyboard with your Acer Chromebook, you can still take screenshots with ease.
Here are the steps to follow:
- Connect your external keyboard to your Chromebook.
- Locate the Print Screen key on your external keyboard. It is typically labeled “PrtSc” or “PrtScn.”
- To take a full-screen screenshot, press the “Ctrl” and “PrtSc” keys simultaneously. The screenshot will be saved to your Downloads folder.
- To take a partial screenshot, press the “Ctrl,” “Shift,” and “PrtSc” keys simultaneously. Your cursor will turn into a crosshair. Click and drag your cursor to select the area you want to capture. Release the mouse button to take the screenshot. The screenshot will be saved to your Downloads folder.
Note that some external keyboards may not have a Print Screen key.
In this case, you can use the “Ctrl” and “F5” keys instead.
Using an external keyboard for screenshots on your Acer Chromebook is a quick and easy way to capture what’s on your screen.
With just a few keystrokes, you can take full-screen or partial screenshots and save them to your Downloads folder.
Managing Screenshots on Acer Chromebook
Taking screenshots on your Acer Chromebook is a breeze, but what do you do with them once you’ve captured your screen?
In this section, we’ll show you how to manage your screenshots on your Acer Chromebook.
Saving Screenshots
When you take a screenshot on your Acer Chromebook, it is automatically saved to the “Screenshots” folder in your file manager.
You can access this folder by opening your file manager and clicking on the “Screenshots” folder.
Moving Screenshots to Google Drive
If you want to save your screenshots to Google Drive, you can easily do so.
Simply open your file manager, right-click on the screenshot you want to save, and select “Copy to Google Drive”.
This will create a copy of your screenshot in your Google Drive account.
Downloading Screenshots
If you want to download your screenshots to your computer, you can do so by opening your file manager, right-clicking on the screenshot you want to download, and selecting “Download”.
This will download the screenshot to your “Downloads” folder.
Copying Screenshots to Clipboard
If you want to copy your screenshot to your clipboard, you can do so by opening your file manager, right-clicking on the screenshot you want to copy, and selecting “Copy to clipboard”.
This will copy the screenshot to your clipboard, allowing you to paste it into other applications.
Managing your screenshots on your Acer Chromebook is easy and straightforward.
Whether you want to save them to Google Drive, download them to your computer, or copy them to your clipboard, there are plenty of options available to you.
Editing Screenshots on Acer Chromebook
Once you have taken a screenshot on your Acer Chromebook, you may want to edit it before sharing it with others.
Fortunately, editing screenshots on Acer Chromebook is a breeze.
In this section, we will guide you through the process of editing screenshots on your Acer Chromebook.
To edit a screenshot on your Acer Chromebook, you can use the built-in image editor.
To access the image editor, open the “Files” app and navigate to the “Downloads” folder.
Find the screenshot you want to edit and double-click on it to open it in the image editor.
Once the screenshot is open in the image editor, you can use various tools to edit it.
Here are some of the tools available in the image editor:
- Crop Tool: You can use the crop tool to crop the screenshot to a specific size or shape. To use the crop tool, click on the crop icon in the top bar of the image editor and select the size you want to crop the image to.
- Pen Tool: If you have a stylus or a pen, you can use the pen tool to draw on the screenshot. To use the pen tool, click on the pen icon in the top bar of the image editor and select the color and size of the pen.
- Text Tool: You can use the text tool to add text to the screenshot. To use the text tool, click on the text icon in the top bar of the image editor and type the text you want to add.
- Highlight Tool: You can use the highlight tool to highlight specific parts of the screenshot. To use the highlight tool, click on the highlight icon in the top bar of the image editor and select the color and size of the highlighter.
Once you have made the necessary edits to the screenshot, you can save it by clicking on the “Save” button in the top bar of the image editor.
You can also share the edited screenshot directly from the image editor by clicking on the “Share” button.
Troubleshooting Screenshot Issues
If you’re having trouble taking screenshots on your Acer Chromebook, don’t worry.
There are a few things you can try to fix the issue.
First, make sure that your Chromebook is up to date.
Sometimes, outdated software can cause problems with taking screenshots.
To check for updates, click on the clock in the bottom-right corner of your screen, then click on the gear icon to open the settings menu.
From there, click on “About Chrome OS” and then click on “Check for updates.”
If there are any updates available, download and install them.
If your Chromebook is up to date but you’re still having trouble taking screenshots, try restarting your Chromebook.
This can sometimes fix issues with software or hardware.
To restart your Chromebook, click on the clock in the bottom-right corner of your screen, then click on the power icon and select “Restart.”
Another thing to check is your keyboard settings.
Some keyboards may have different key combinations for taking screenshots.
Make sure that you’re using the correct key combination for your keyboard.
You can check your keyboard settings by clicking on the clock in the bottom-right corner of your screen, then clicking on the gear icon to open the settings menu.
From there, click on “Device” and then click on “Keyboard.”
If you’re still having trouble taking screenshots, you may want to try resetting your Chromebook to its factory settings.
This will erase all of your data and settings, so make sure to back up any important files before resetting.
To reset your Chromebook, click on the clock in the bottom-right corner of your screen, then click on the power icon and select “Shut down.”
Once your Chromebook is off, press and hold the refresh button (which is located above the 3 and 4 keys) and then press the power button.
Hold both buttons until the Chromebook boots up, and then follow the on-screen instructions to reset your Chromebook.
If none of these solutions work, you may want to contact Acer support or bring your Chromebook to a technician for further assistance.
Comparing Acer Chromebook with Other Devices
If you are in the market for a new device and are considering a Chromebook, you may be wondering how it compares to other options such as Windows or Mac devices.
Here are some key factors to consider when comparing Acer Chromebook with other devices:
Price
One of the main advantages of Acer Chromebook is its affordability.
Compared to Windows or Mac devices, Chromebooks tend to be much cheaper, making them a great option for those on a budget or who don’t need all the bells and whistles of a more expensive device.
User Interface
Acer Chromebook runs on the Chrome OS, which is a simple and easy-to-use interface.
It is similar to the Chrome browser, with all your apps and settings easily accessible from the main screen.
Windows 10 and Macs, on the other hand, have more complex interfaces with more features and options.
Performance
Acer Chromebook is designed for basic tasks such as web browsing, email, and document editing.
It may not be the best option for more demanding tasks such as video editing or gaming.
Windows and Mac devices, on the other hand, are more versatile and can handle a wider range of tasks.
Apps and Software
Acer Chromebook relies on web-based apps such as Google Docs and Gmail, which may not be as feature-rich as traditional desktop apps.
However, many popular apps such as Microsoft Office and Adobe Creative Suite are available as web apps or Android apps on Chromebooks.
Windows and Mac devices have a wider range of apps and software available, but they may come at a higher cost.
Finding the Best Deals for Acer Chromebooks
If you’re looking for a great deal on an Acer Chromebook, there are a few things you can do to make sure you’re getting the best price.
Here are some tips to help you find the best deals on Acer Chromebooks:
- Check Amazon: Amazon is a great place to find deals on Acer Chromebooks. They often have sales and discounts on these devices, so it’s worth checking regularly to see if there are any deals available.
- Look for refurbished models: Refurbished Acer Chromebooks can be a great way to save money. These devices have been restored to like-new condition and are often sold at a significant discount.
- Compare prices: Before you make a purchase, be sure to compare prices from different retailers. This will help you find the best deal on the Acer Chromebook you want.
- Check for student discounts: If you’re a student, you may be eligible for a discount on an Acer Chromebook. Check with your school or with Acer directly to see if there are any discounts available.
- Consider older models: If you don’t need the latest and greatest Acer Chromebook, consider purchasing an older model. These devices are often sold at a discount and can still provide plenty of functionality for most users.
By following these tips, you can find the best deals on Acer Chromebooks and save money on your purchase.
Whether you’re looking for a basic model or a high-end device, there are plenty of options available that will fit your needs and your budget.
Key Takeaways
Taking a screenshot on your Acer Chromebook is a simple process that can be completed with just a few clicks.
Whether you want to capture an image of your screen or a specific window, there are several methods available to you.
One of the easiest ways to take a screenshot on your Acer Chromebook is by using the keyboard shortcut Ctrl + . (period).
This will capture a screenshot of your current window and save it to the Screenshots folder in your file manager.
You can then retrieve the image file and use it as needed.
If you want to capture a screenshot of your entire screen, you can use the keyboard shortcut Ctrl + Shift + . (period).
This will capture an image of your entire screen and save it to the Screenshots folder in your file manager.
Another option for taking screenshots on your Acer Chromebook is to use the built-in screen capture tool.
To access this tool, click the clock on the taskbar to open the Quick Settings panel, then select the arrow in the top-right corner of the menu.
Next, click the “Screen Capture” button to open the screen capture tool.
Once the screen capture tool is open, you can choose to capture a specific area of your screen, a specific window, or your entire screen.
You can also choose to include or exclude the mouse cursor in your screenshot.