


Turning on your Dell monitor is a simple process that requires a few steps.
Whether you are setting up a new monitor or trying to troubleshoot an existing one, it’s important to know how to turn on your Dell monitor properly.
In this article, we will guide you through the steps to turn on your Dell monitor.
First, make sure your monitor is plugged into a power source.
Look for the power cable that came with your monitor and connect it to a power outlet.
Once you’ve done that, locate the power button on your Dell monitor.
Depending on the model, the power button may be located on the bottom-right corner of the screen or on the left side edge.
Press the power button firmly to turn on your Dell monitor.
If your Dell monitor is still not turning on, there may be other factors at play.
In the following sections, we will provide more detailed instructions on how to troubleshoot your monitor if it does not turn on.
By following these steps, you should be able to get your Dell monitor up and running in no time.
Post Contents
Identifying Your Dell Monitor
When it comes to turning on your Dell monitor, the first step is to identify the specific model you have.
This is important because different Dell monitors may have different power buttons or locations.
Here are a few ways to identify your Dell monitor:
Look for the Model Number
The model number of your Dell monitor can usually be found on a sticker on the back of the monitor.
It may also be located on the front or bottom of the monitor.
Once you have the model number, you can search online for the specific instructions for your monitor.
Check the Dell Website
If you don’t have the model number handy, you can also check the Dell website for information on your monitor.
Simply go to the Dell website and search for your monitor by name or model number.
This should bring up a page with all the relevant information about your monitor.
Check the User Manual
If you still have the user manual that came with your Dell monitor, this is another great resource for identifying your monitor.
The user manual should have all the information you need to turn on your monitor, as well as any troubleshooting tips or other helpful information.
Look for the Power Button
Once you have identified your Dell monitor, the next step is to locate the power button.
Depending on the model of your monitor, the power button may be located on the front, back, or side of the monitor.
Look for a button that is labeled “power” or has a power symbol on it.
Other Tips
If you’re having trouble identifying your Dell monitor or turning it on, here are a few other tips to keep in mind:
- Make sure the monitor is plugged in and connected to a power source.
- Check that the power cable is securely connected to the monitor and the power source.
- If you’re using a laptop, make sure that the monitor is set up as an external display in the display settings.
- Try pressing and holding the power button for a few seconds to see if the monitor turns on.
By following these tips, you should be able to identify your Dell monitor and turn it on with ease.
How to Turn on Dell Monitor
If you have just purchased a Dell monitor, you may be wondering how to turn it on.
Follow these simple steps to get your monitor up and running.
Locating the Power Button
The power button on a Dell monitor is usually located on the front or bottom-right corner of the screen or on the left side edge.
Look for a button with a power symbol or an icon of a power plug.
Once you have located the power button, you are ready to turn on your monitor.
Checking the Power Source
Before you turn on your Dell monitor, make sure it is connected to a power source.
Connect the power cord to the monitor and plug it into an electrical outlet or power strip.
Make sure the power switch on the back of the monitor is in the “on” position.
Connecting to a Computer
To connect your Dell monitor to a computer, you will need a video cable.
The type of cable you need will depend on your computer’s video output.
The most common types of video cables are VGA, DVI, HDMI, and DisplayPort.
Once you have connected your monitor to your computer, turn on your computer.
Press the power button on your Dell monitor to turn it on.
If your monitor does not turn on, make sure the power cord is securely plugged into both the monitor and the electrical outlet or power strip.
Understanding Monitor Ports and Connections
When it comes to turning on your Dell monitor, understanding the different ports and connections available can be helpful.
Here are some common types of ports and connections you may come across:
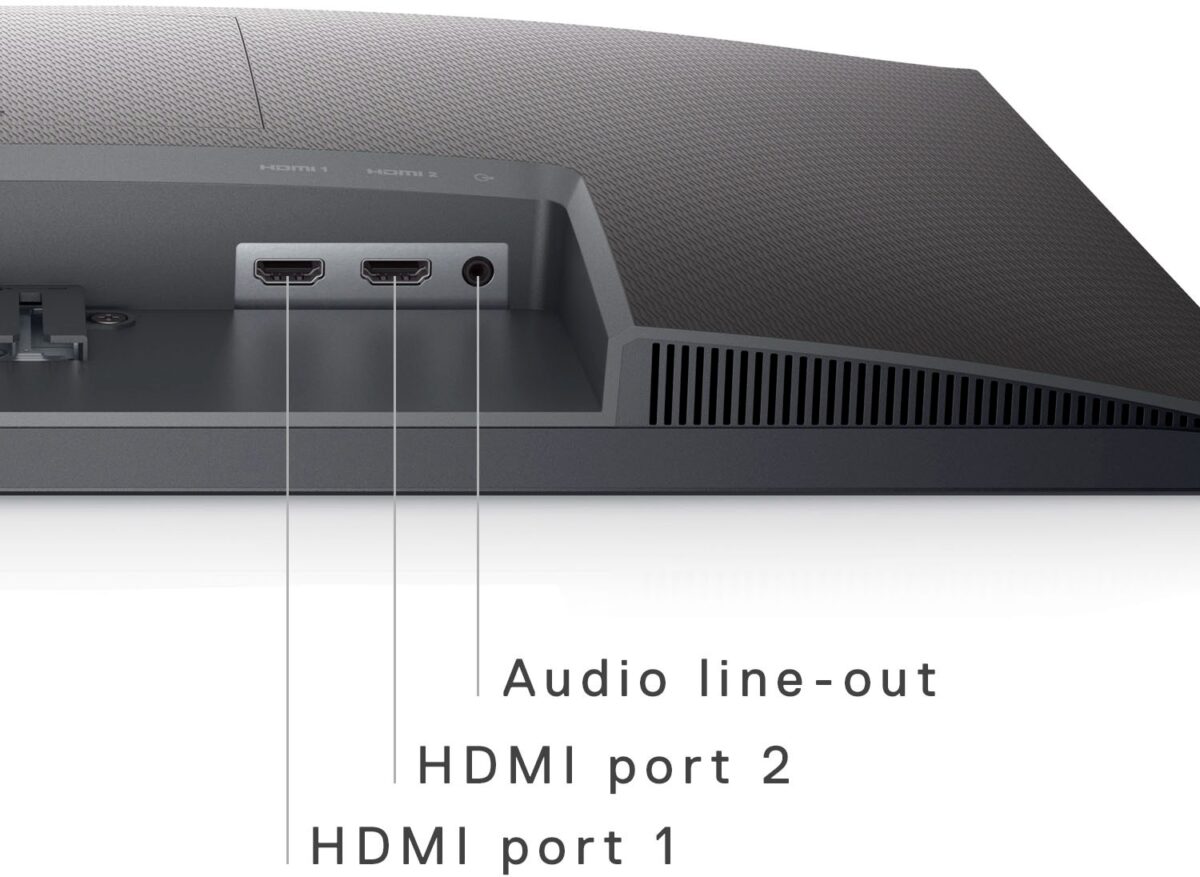
HDMI and VGA Ports
HDMI and VGA ports are two of the most commonly used ports for connecting monitors to computers.
HDMI ports are typically found on newer Dell monitors and offer high-definition video and audio in a single cable.
VGA ports are older and offer lower quality video, but are still commonly used on older computers.
To connect your Dell monitor using an HDMI or VGA port, you’ll need the appropriate video cable and connect it from your computer to your monitor.
DVI and DisplayPort Connections
DVI and DisplayPort are two other types of connections that are commonly used for connecting monitors to computers.
DVI ports offer high-quality video and are commonly found on older Dell monitors.
DisplayPort is a newer connection that offers high-quality video and audio in a single cable.
To connect your Dell monitor using a DVI or DisplayPort connection, you’ll need the appropriate video cable and connect it from your computer to your monitor.
Dell Docking Station
If you have a Dell laptop, you may want to consider using a Dell docking station to connect your laptop to your monitor.
A docking station allows you to connect multiple peripherals, including your monitor, to your laptop with a single cable.
To use a Dell docking station, connect the docking station to your laptop and connect your monitor to the docking station using the appropriate video cable.
Understanding the different ports and connections available for your Dell monitor can help you to easily connect your monitor to your computer.
Dealing With Display Issues
If you are experiencing display issues with your Dell monitor, there are a few things you can try to resolve the issue.
Here are some troubleshooting steps you can take:
Adjusting Brightness and Contrast
If your Dell monitor’s display is too bright or too dark, you can adjust the brightness and contrast settings to improve the display quality.
To adjust the brightness and contrast, follow these steps:
- Press the menu button on your Dell monitor.
- Use the arrow keys to navigate to the Brightness/Contrast setting.
- Adjust the brightness and contrast settings to your desired levels.
- Press the menu button to exit the menu.
Addressing Vertical Lines
If you are seeing vertical lines on your Dell monitor’s display, it could be due to a loose or damaged video cable.
To address this issue, follow these steps:
- Check the video cable connections on both the monitor and the computer.
- If the connections are loose, disconnect and reconnect the cable.
- If the cable is damaged, replace it with a new one.
Performing a Hard Reset
If your Dell monitor’s display is still not working properly, you can perform a hard reset to reset the monitor to its default settings.
To perform a hard reset, follow these steps:
- Turn off the Dell monitor.
- Unplug the power cord from the monitor and the wall outlet.
- Press and hold the power button on the monitor for 10-15 seconds.
- Release the power button.
- Reconnect the power cord to the monitor and the wall outlet.
- Turn on the Dell monitor.
By following these troubleshooting steps, you should be able to resolve most display issues with your Dell monitor.
Using Multiple Monitors
If you have multiple monitors, you can increase your productivity by using them together.
With Dell monitors, you can easily set up multiple monitors and customize their settings according to your needs.
To use multiple monitors, you need to connect them to your computer’s output device.
Depending on your computer’s output device, you can connect your monitors using HDMI, VGA, or DisplayPort cables.
Once you have connected your monitors, you can configure their settings in your computer’s display settings.
In Windows, you can easily configure your multiple monitors by going to Settings > System > Display.
From there, you can choose how you want your monitors to be arranged, and you can also customize their resolution, scaling, and orientation.
If you’re using a Dell monitor, you can take advantage of its MultiMonitor Sync (MMS) feature.
This feature allows you to synchronize a pre-defined group of OSD settings in the background, so you don’t have to manually adjust your settings every time you switch between monitors.
Another useful feature of Dell monitors is their Premium Panel Exchange program.
This program allows you to exchange your monitor for a new one if you find any bright pixel defects within the first 30 days of purchase.
Troubleshooting Dell Monitor Problems
If your Dell monitor is not turning on, don’t panic.
There are a few simple troubleshooting steps you can take to identify and fix the issue.
In this section, we will cover the most common problems that can prevent your Dell monitor from turning on and how to troubleshoot them.
Checking the Power Cable
The first thing you should do is check the power cable.
Make sure that the power cable is securely plugged into the monitor and the power outlet.
If the cable is loose, your monitor may not receive enough power to turn on.
Also, check if the power outlet is working correctly. You can try plugging in another device to see if it works.
Examining the Monitor Stand
If the power cable is connected correctly, examine the monitor stand.
Make sure that the stand is stable and not wobbly.
If the stand is unstable, your monitor may not turn on.
Also, check if the monitor is properly seated on the stand.
If the monitor is not seated correctly, it may not receive enough power to turn on.
Running a Hardware Diagnostic
If the power cable and monitor stand are not the issue, you can run a hardware diagnostic.
Dell monitors come with built-in diagnostic tools that can help you identify and fix hardware problems.
To run the diagnostic, follow these steps:
- Turn off your Dell monitor.
- Disconnect all cables except the power cable.
- Press and hold the monitor’s power button for 8-10 seconds.
- Release the power button and wait for the diagnostic tool to start.
- Follow the on-screen instructions to complete the diagnostic test.
The diagnostic tool will test your monitor’s hardware components, including the power supply, video card, and display.
If the diagnostic tool finds any problems, it will provide you with a report and recommend a solution.
Software and Driver Updates
To ensure that your Dell monitor is running at its best, it’s important to keep its software and drivers up to date.
This will help you avoid any issues with your monitor and ensure that you can take advantage of any new features that Dell may have released.
To get started, you can visit the Dell website and navigate to the Drivers & Downloads section.
From there, you can enter your monitor’s model number or service tag to find the latest software and drivers available for your device.
You can also use the Dell Command Update tool to automatically check for updates.
If you’re using Windows, you can also use the built-in Device Manager to check for driver updates.
Simply right-click on your monitor in the Device Manager and select “Update Driver.”
Windows will then search for the latest driver and install it for you.
When you’re updating your monitor’s software and drivers, it’s important to make sure that you’re downloading them from a trusted source.
Always download updates directly from the Dell website or use the Dell Command Update tool to ensure that you’re getting the latest, most secure updates.
In addition to keeping your monitor up to date, updating your software and drivers can also help improve your monitor’s performance.
This can include better color accuracy, faster response times, and improved compatibility with other devices.
By keeping your Dell monitor’s software and drivers up to date, you can ensure that you’re getting the best possible performance from your device.
So be sure to check for updates regularly and take advantage of any new features and improvements that Dell may have released.
Getting Technical Support from Dell
If you have tried all the troubleshooting steps and your Dell monitor is still not turning on, it may be time to seek technical support from Dell.
Here are some steps you can take to get the help you need:
- Contact Dell Technical Support: You can contact Dell Technical Support by phone or online chat. Before you contact them, make sure you have your monitor’s service tag or express service code, which can be found on the back of the monitor or in the monitor’s documentation.
- Describe the Problem: When you contact Dell Technical Support, be sure to describe the problem you are having in as much detail as possible. This will help the technician understand the issue and provide you with the best possible solution.
- Provide Relevant Information: Be prepared to provide the technician with any relevant information, such as error messages or codes, that may help diagnose the problem.
- Follow the Technician’s Instructions: The technician may ask you to perform certain steps or provide additional information. Follow their instructions carefully to ensure the best possible outcome.
- Consider Warranty Options: If your monitor is still under warranty, Dell Technical Support may be able to provide a repair or replacement at no cost to you. Be sure to check your warranty status before contacting technical support.
By following these steps, you can get the technical support you need to get your Dell monitor up and running again.
Remember to be patient and courteous when dealing with technical support, as they are there to help you.
Repair and Damage
If your Dell monitor does not turn on, it may be experiencing a power issue.
In some cases, the monitor may have been damaged, and this damage may be the cause of the problem.
Here are some tips on how to identify and repair damage to your Dell monitor.
Identifying Damage
Before attempting to repair your monitor, it is important to identify any damage that may be present.
Some signs of damage include cracks or dents in the monitor casing, a broken or loose power cord, or a damaged motherboard.
If you suspect that your monitor has been damaged, it is best to contact Dell Technical Support for repair options.
Repairing Damage
If your monitor has been damaged, there are a few steps you can take to repair it.
First, try to identify the specific component that is damaged.
For example, if the power cord is damaged, you may need to replace it.
If the motherboard is damaged, you may need to replace it or have it repaired by a professional.
If you are comfortable working with electronics, you may be able to repair the damage yourself.
However, if you are not experienced with electronics repair, it is best to seek professional help.
Preventing Damage
To prevent damage to your Dell monitor, it is important to handle it with care.
Always transport your monitor in a protective case or bag, and avoid dropping or bumping it.
Additionally, be sure to use the correct power cord and adapter for your monitor, and avoid exposing it to extreme temperatures or moisture.
By taking these steps to prevent and repair damage to your Dell monitor, you can ensure that it continues to function properly and provide you with high-quality display performance.
Key Takeaways
Here are some key takeaways for turning on your Dell monitor:
- Connect your Dell monitor to a power source.
- Locate the power button on your Dell monitor. It is usually located at the bottom-right corner of the screen or the left side edge.
- Firmly press the power button to turn on your Dell monitor.
- Ensure that the power cable is fully inserted at both ends.
- If your monitor is not turning on, try swapping with a known-good power cable, if one is available.
- Verify the exact location of the power light on the monitor by referring to the user manual.
- If the power LED is off, test the power outlet being used by plugging in another electrical device and verifying that there is power.
- If the monitor has no power, press the power button and wait for three to five seconds.
- Make sure that the monitor’s power switch is in the “on” position.
- If you are using a Dell UltraSharp U3223QE monitor, you may need to reconnect both ends of the Ethernet cable if the LED is not lit.
- If you are using a Dell C2722DE monitor, make sure you have set the monitor Mic/webcam as the default device and selected the monitor Mic/webcam as the default in the PC side.
By following these simple steps, you should be able to turn on your Dell monitor without any issues.
If you continue to experience problems, refer to the user manual or contact Dell customer support for further assistance.