


How to reset a Dell computer?
If you’re experiencing issues with your Dell computer, resetting it to its factory settings can be a helpful solution.
A factory reset will erase all of your personal files, settings, and applications, and restore your computer to its original state.
This can be especially useful if you’re planning to sell or donate your computer, or if you’re experiencing persistent software issues.
There are a few different ways to reset your Dell computer, depending on your specific model and the severity of the issues you’re experiencing.
One option is to use the SupportAssist OS Recovery tool, which is recommended by Dell for supported computers.
This tool can help you diagnose hardware issues, backup files, repair your computer, or restore it to its factory defaults.
Another option is to perform a factory reset via the Windows Recovery Environment, which can be accessed by restarting or powering on your computer and clicking the power button when you reach the login screen.
Post Contents
- 1 Understanding the Need to Reset a Dell Computer
- 2 Preparing for the Reset Process
- 3 How to Reset a Dell Computer
- 4 Using the ‘Reset This PC’ Option
- 5 Utilizing Dell’s Factory Image Restore
- 6 Restoring from a System Restore Point
- 7 Reinstalling the Operating System
- 8 Using Dell’s SupportAssist OS Recovery
- 9 Resetting a Dell Laptop
- 10 Resetting Other Dell Models
- 11 Troubleshooting Reset Issues
- 12 Protecting Your Personal Information
- 13 Understanding the Role of Drivers and Software
- 14 Resetting Your Dell Computer’s Password
- 15 Dealing with Residual Power
- 16 Using Recovery Media
- 17 Resetting a Cloud-Based Dell Computer
- 18 Comparing Dell’s Reset Process with Other Brands
- 19 Key Takeaways
Understanding the Need to Reset a Dell Computer

If you own a Dell computer, there may come a time when you need to reset it.
There are several reasons why you might need to do this.
Here are some of the most common reasons:
- Your computer is running slow: If your Dell computer is running slow, it could be due to a variety of reasons. One of the most common reasons is that your computer is infected with a virus or malware. Resetting your computer can help to remove any viruses or malware that may be causing your computer to run slow.
- You want to sell or give away your computer: If you want to sell or give away your Dell computer, it’s important to reset it to factory settings. This will remove all of your personal data from the computer and ensure that the new owner can start fresh.
- You’re experiencing software issues: If you’re experiencing software issues on your Dell computer, resetting it can help to resolve the problem. This is especially true if the issue is related to a recent software installation or update.
- You want to start fresh: Sometimes, you may simply want to start fresh with your Dell computer. Resetting it to factory settings can give you a clean slate and help to improve the overall performance of your computer.
Regardless of the reason why you need to reset your Dell computer, it’s important to understand the process.
In the next section, we’ll take a look at how to reset your Dell computer to factory settings.
Preparing for the Reset Process
Before resetting your Dell computer, it is important to prepare for the process to avoid losing any important data.
Follow these steps to ensure a smooth reset process:
- Backup your data: Before you begin the reset process, it is essential to back up your personal files and data to prevent losing them. You can use an external hard drive, cloud storage, or USB drive to make an emergency backup of your data. Make sure you have all the necessary files backed up before proceeding with the reset process.
- Partition your hard drive: If you have important data that you want to keep, consider partitioning your hard drive. This will allow you to keep your personal data separate from the operating system files. In case of a reset, you can easily restore your personal files from the partitioned drive.
- Remove unnecessary files: It is a good idea to remove any unnecessary files or programs from your computer before resetting it. This will free up space on your hard drive and make the reset process faster.
- Create a recovery drive: Creating a recovery drive is another way to ensure that you can restore your computer to its original state if something goes wrong during the reset process. You can create a recovery drive using the built-in Windows recovery tool or using Dell SupportAssist OS Recovery.
By following these steps, you can ensure that your personal data is safe and that the reset process goes smoothly.
Remember to take your time and follow the instructions carefully to avoid any issues or complications.
How to Reset a Dell Computer
If you want to reset your Dell computer, there are a few different methods you can use depending on your situation.
Here are some steps you can follow to reset your Dell computer:
Resetting Your Computer to Factory Settings
Resetting your Dell computer to factory settings is a good option if you want to remove everything from your computer and start fresh.
Here are the steps to do this:
- Back up your important files to an external hard drive or cloud storage service.
- Restart your computer and press F8 repeatedly until the Advanced Boot Options menu appears.
- Use the arrow keys to select “Repair Your Computer” and press Enter.
- Select your language and log in with your administrator account.
- Click “Dell Factory Image Restore” and follow the prompts to reset your computer to its factory settings.
Performing a Hard Reset
If your Dell computer is frozen or not responding, you can perform a hard reset to fix the problem.
Here’s how to do it:
- Turn off your computer and unplug it from the power source.
- Remove the battery if you have a laptop.
- Press and hold the power button for 15-20 seconds to drain any residual power.
- Reconnect the power source and turn on your computer.
Using Dell SupportAssist OS Recovery
Dell SupportAssist OS Recovery is a tool that can help you reset your Dell computer if it’s not working properly.
Here’s how to use it:
- Restart your computer and press F12 repeatedly until the Boot menu appears.
- Select “Diagnostics” and press Enter.
- Follow the prompts to run a diagnostic test on your computer.
- If the test finds any errors, select “SupportAssist OS Recovery” and follow the prompts to reset your computer.
Removing Everything from Your Computer
If you want to remove everything from your Dell computer and start fresh, you can use the “Remove Everything” option in Windows.
Here’s how to do it:
- Back up your important files to an external hard drive or cloud storage service.
- Go to Settings > Update & Security > Recovery.
- Under “Reset this PC,” click “Get started.”
- Select “Remove everything” and follow the prompts to reset your computer.
By following these steps, you can reset your Dell computer and start fresh with a clean slate.
Just remember to back up your important files before resetting your computer to avoid losing any data.
Using the ‘Reset This PC’ Option
If you are experiencing issues with your Dell computer, resetting it to its factory settings can often solve the problem.
One way to do this is by using the ‘Reset This PC’ option, which is available in the Windows operating system.
To access the ‘Reset This PC’ option, go to the Start menu and click on the gear icon to open the Settings app.
From there, click on the ‘Update & Security’ option and then select the ‘Recovery’ tab.
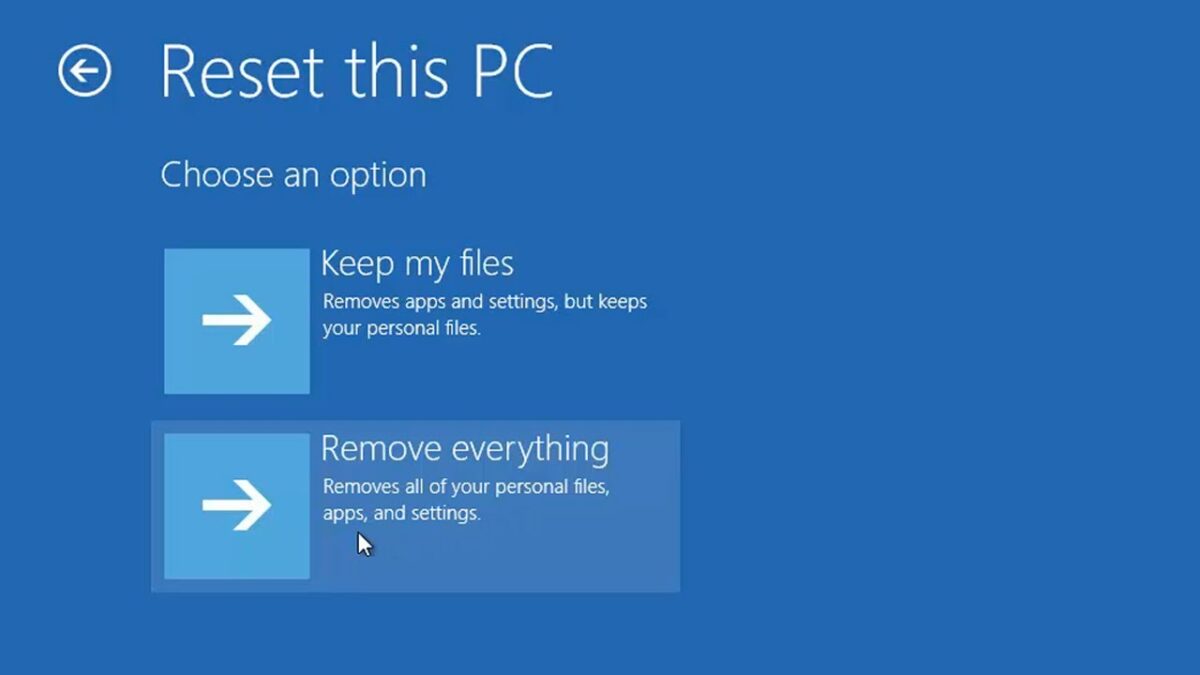
Under the ‘Reset This PC’ section, you will see two options: ‘Keep my files’ and ‘Remove everything’.
The former will reset your computer to its factory settings while keeping your personal files intact, while the latter will delete all your files and reset your computer completely.
Before proceeding with the reset, it is important to back up any important files or data that you want to keep.
Once you have done this, select the option that suits your needs and click on the ‘Get started’ button.
The reset process may take some time, depending on the size of your hard drive and the amount of data being deleted.
Once the reset is complete, your computer will be restored to its factory settings and any issues you were experiencing should be resolved.
It is worth noting that the ‘Reset This PC’ option is only available in Windows 8, Windows 8.1, Windows 10, and Windows 11.
If you are using an older version of Windows, you may need to use a different method to reset your Dell computer.
Utilizing Dell’s Factory Image Restore
If you want to reset your Dell computer to its original factory settings, you can use Dell’s Factory Image Restore feature.
This will erase all your personal files and installed programs, so make sure to back up any important data before proceeding.
To access the Factory Image Restore feature, follow these steps:
- Restart your computer and press the F8 key repeatedly until the Advanced Boot Options menu appears.
- Use the arrow keys to select Repair Your Computer and press Enter.
- Select your language and log in as an administrator.
- Click on Dell Factory Image Restore and follow the on-screen instructions.
Note that the exact steps may vary depending on your Dell computer model and operating system version.
When you use the Factory Image Restore feature, your Dell computer will be restored to its original factory settings, including all the pre-installed software and drivers.
This can be useful if your computer is running slow or has been infected with malware, as it will remove any software-related issues.
However, it’s important to note that this feature will also delete all your personal files and installed programs, so make sure to back up any important data before proceeding.
You can use an external hard drive, USB drive, or cloud storage service to back up your files.
In addition, if your Dell computer came with a recovery partition, you can also use that to restore your computer to its factory settings.
To access the recovery partition, restart your computer and press the F11 key repeatedly until the recovery screen appears.
Restoring from a System Restore Point
If your Dell computer is experiencing issues, you may want to consider restoring it from a system restore point.
A system restore point is a snapshot of your computer’s settings and configuration at a specific point in time.
Restoring from a system restore point can help fix issues caused by recent changes to your computer, such as installing new apps or updates.
Here are the steps to restore your Dell computer from a system restore point:
- Press the Windows key on your keyboard and type “System Restore” in the search bar. Click on “Create a restore point” from the search results.
- Click on the “System Restore” button in the System Properties window.
- Select a restore point from the list of available restore points. If you’re not sure which restore point to choose, select the most recent one.
- Click “Next” and then “Finish” to start the restore process.
Keep in mind that restoring from a system restore point will remove any apps, drivers, and updates that were installed after the restore point was created.
However, your personal files will not be affected.
It’s important to note that not all issues can be fixed by restoring from a system restore point.
If your Dell computer is experiencing hardware issues, it may not be able to boot up or restore from a system restore point.
In this case, you may need to consider other options, such as using Dell’s SupportAssist OS Recovery tool or reinstalling Windows.
Reinstalling the Operating System
If your Dell computer is experiencing issues that cannot be resolved through other troubleshooting methods, reinstalling the operating system may be necessary.
This process will erase all data on the computer, so it’s important to back up any important files before proceeding.
To reinstall the operating system on your Dell computer, you can use the Dell Operating System Recovery Image.
This image is a factory-installed version of the operating system and software that was shipped with your computer.
Here are the steps to reinstall the operating system using the Dell Operating System Recovery Image:
- Turn on your computer and press the F12 key repeatedly until the Boot menu appears.
- Use the arrow keys to select “Dell Recovery” and press Enter.
- Select “Windows Setup [EMS Enabled]” and click Next.
- Read and accept the End User License Agreement, then click Next.
- Select “Custom (Advanced)” as the installation type.
- Choose the partition where you want to install the operating system and click Next.
- Follow the prompts to complete the installation process.
It’s important to note that reinstalling the operating system will erase all data on the computer, so it’s important to back up any important files before proceeding.
You can use an external hard drive or cloud storage service to back up your files.
Additionally, if your Dell computer came with a recovery partition, you can use that to reinstall the operating system.
To access the recovery partition, turn on your computer and press the F8 key repeatedly until the Advanced Boot Options menu appears.
Select “Repair Your Computer” and follow the prompts to access the recovery partition.
Using Dell’s SupportAssist OS Recovery
If you are experiencing issues with your Dell computer, you can use Dell’s SupportAssist OS Recovery to restore your system to its factory settings.
SupportAssist OS Recovery is a feature that comes pre-installed on most Dell systems.
It allows you to recover your operating system and drivers, as well as other software that came with your computer.
To use SupportAssist OS Recovery, follow these steps:
- Restart your computer and press F12 to enter the boot menu.
- Select SupportAssist OS Recovery from the boot menu and press Enter.
- Follow the on-screen instructions to restore your computer.
Note that SupportAssist OS Recovery will erase all data on your computer’s hard drive, so it’s important to back up any important files before proceeding.
If your computer does not support SupportAssist OS Recovery, you can still restore your system by downloading and using the Dell Operating System Recovery Image.
This image contains the Windows, Ubuntu, or Linux operating system that was factory-installed on your computer.
To download and use the Dell Operating System Recovery Image, follow these steps:
- Go to the Dell Support website and enter your computer’s service tag or express service code.
- Click on Drivers & Downloads and select your operating system.
- Download the Dell Operating System Recovery Image for your computer.
- Create a bootable USB drive using the recovery image.
- Restart your computer and press F12 to enter the boot menu.
- Select the USB drive from the boot menu and press Enter.
- Follow the on-screen instructions to restore your computer.
Remember to back up any important files before proceeding with the restoration process.
Resetting a Dell Laptop

If your Dell laptop is running slow or experiencing software-related issues, resetting it to its factory default state may help.
Here’s how you can reset your Dell laptop:
- Back up your important files: Before resetting your Dell laptop, make sure to back up all your important files, such as documents, photos, and videos, to an external hard drive or cloud storage service. This will ensure that you don’t lose any important data during the reset process.
- Access the reset options: To access the reset options, go to Settings > Update & Security > Recovery. Under Reset this PC, select the Get started button. You’ll see two options: Keep my files and Remove everything. If you want to keep your files, select Keep my files. If you want to remove everything, select Remove everything.
- Follow the on-screen instructions: Once you’ve selected your preferred option, follow the on-screen instructions to reset your Dell laptop. The process may take some time, so be patient and don’t turn off your laptop during the reset process.
- Reinstall your programs and drivers: After the reset process is complete, you’ll need to reinstall your programs and drivers. You can do this by downloading them from the Dell website or using the Dell SupportAssist tool.
It’s important to note that resetting your Dell laptop will erase all your personal files and settings, so make sure to back up everything before proceeding.
Additionally, the reset process may vary depending on the model of your Dell laptop.
For example, resetting an Inspiron laptop may have different steps than resetting an XPS or Alienware laptop.
If you’re unsure about the reset process for your specific Dell laptop model, consult the Dell support website or contact Dell customer support for assistance.
Resetting Other Dell Models
If you have a Dell OptiPlex, Vostro, retired model, fixed workstation, or mobile workstation, you can also perform a hard reset to fix various software-related issues.
Here’s how:
- Turn off your Dell computer and disconnect all peripherals.
- Connect the power cable for desktops or AC adapter and battery for laptops.
- Turn on the computer and repeatedly press the F8 key until the Advanced Boot Options menu appears.
- Use the arrow keys to select Repair Your Computer and press Enter.
- Select your language and log in as an administrator if prompted.
- Click Dell Backup and Recovery or Dell Factory Image Restore, depending on your model.
- Follow the on-screen instructions to reset your Dell computer to its factory settings.
Keep in mind that resetting your Dell computer will erase all your personal files, so make sure to back up your important data before proceeding.
Also, if your Dell computer came with a recovery partition, you can use it instead of a recovery disc or USB drive.
If you encounter any issues during the reset process, you can contact Dell Support for assistance.
They can help you troubleshoot and resolve any problems you may have with your Dell computer.
Troubleshooting Reset Issues
If you are experiencing issues while resetting your Dell computer, don’t worry, there are several things you can try to troubleshoot the problem.
Here are some common issues and their solutions:
Issue 1: Reset process is taking too long
If the reset process is taking longer than expected, don’t panic.
This can happen if your computer has a lot of data or if there are issues with your hard drive.
You can try the following solutions:
- Wait it out: Sometimes, the reset process can take a long time, especially if you have a lot of data on your computer. Just be patient and wait for the process to complete.
- Check your hard drive: If your hard drive is failing, it can cause the reset process to take longer than usual. You can use the built-in Windows tool, Check Disk, to check your hard drive for errors.
- Use WinRE mode: If you are unable to reset your computer normally, you can try resetting it using WinRE mode. To do this, restart your computer and press F8 repeatedly until the Advanced Boot Options menu appears. From there, select Repair Your Computer and then select Troubleshoot > Reset Your PC.
Issue 2: Reset process is stuck at a certain percentage
If the reset process is stuck at a certain percentage, it could mean that there is an issue with your computer’s hardware or software.
Here’s what you can do:
- Restart your computer: Try restarting your computer and see if that fixes the issue. Sometimes, a simple restart can help.
- Disconnect external devices: If you have any external devices connected to your computer, try disconnecting them and then restarting the reset process.
- Use Advanced Startup: If the reset process is still stuck, you can try using Advanced Startup to reset your computer. To do this, go to Settings > Update & Security > Recovery > Advanced Startup. From there, select Troubleshoot > Reset Your PC.
Issue 3: Reset process fails to complete
If the reset process fails to complete, it could mean that there is an issue with your computer’s hardware.
Here are some things you can try:
- Check your hard drive: If your hard drive is failing, it can cause the reset process to fail. You can use the built-in Windows tool, Check Disk, to check your hard drive for errors.
- Use Advanced Startup: If the reset process fails to complete, you can try using Advanced Startup to reset your computer. To do this, go to Settings > Update & Security > Recovery > Advanced Startup. From there, select Troubleshoot > Reset Your PC.
- Repair your computer: If the reset process fails to complete, you can try repairing your computer using Advanced Startup. To do this, go to Settings > Update & Security > Recovery > Advanced Startup. From there, select Troubleshoot > Advanced Options > Startup Repair.
By following these troubleshooting steps, you should be able to reset your Dell computer without any issues.
If you are still having problems, you may need to contact Dell support for further assistance.
Protecting Your Personal Information
When resetting your Dell computer, it is important to take steps to protect your personal information.
This includes removing your files and refreshing the computer to its factory settings.
To remove your files, you can use the Dell Reset feature or the Windows Reset feature.
Both options will erase your personal data, but the Dell Reset feature is compatible with Dell SupportAssist OS Recovery, which can help diagnose hardware issues and repair the computer.
Before resetting your computer, make sure to back up any important files to an external hard drive or cloud storage.
This will ensure that you do not lose any important data during the reset process.
Once you have backed up your files, you can proceed with resetting your computer.
During the reset process, you will have the option to remove your files or refresh the computer.
Removing your files will erase all personal data, while refreshing the computer will keep your personal files but remove any installed apps and settings.
After the reset process is complete, it is important to take additional steps to protect your personal information.
This includes setting up a strong password and enabling two-factor authentication for your accounts.
Understanding the Role of Drivers and Software
When resetting your Dell computer, it is important to understand the role of drivers and software.
Drivers are software components that allow your computer’s operating system to communicate with hardware devices like printers, scanners, and cameras.
Software, on the other hand, refers to programs that run on your computer, such as Microsoft Office, Adobe Photoshop, and antivirus software.
During the reset process, your computer’s operating system will be restored to its original factory settings.
This means that any drivers and software that you have installed since you first received your computer will be removed.
You will need to reinstall them after the reset is complete.
It is important to ensure that you have the necessary drivers and software before resetting your Dell computer.
You can download the latest drivers and software from the Dell website.
It is also a good idea to check for any updates to your drivers and software before reinstalling them.
This will ensure that you have the latest versions and that they are compatible with your operating system.
Keep in mind that not all drivers and software will be necessary for your computer to function properly.
Some drivers and software are specific to certain hardware devices or programs.
If you are unsure which drivers and software you need to reinstall, consult the documentation that came with your computer or contact Dell support for assistance.
Resetting Your Dell Computer’s Password
Forgetting your Dell computer’s password can be frustrating, but luckily, resetting it is a straightforward process.
Here’s how you can reset your Dell computer’s password:
Method 1: Resetting Your Password Using Microsoft Account
If you’re using a Microsoft account to sign in to your Dell computer, you can reset your password by following these steps:
- Go to the Microsoft account password reset page on a different device.
- Enter the email address or phone number associated with your Microsoft account and follow the prompts to verify your identity.
- Once you’ve verified your identity, you’ll be able to reset your Microsoft account password.
- Use your new Microsoft account password to sign in to your Dell computer.
Method 2: Resetting Your Password Using a Password Reset Disk
If you’ve previously created a password reset disk for your Dell computer, you can use it to reset your password by following these steps:
- Insert the password reset disk into your Dell computer.
- On the login screen, click the “Reset Password” link.
- Follow the prompts to reset your password using the password reset disk.
Method 3: Resetting Your Password Using a Windows Installation Disk
If you don’t have a password reset disk, you can use a Windows installation disk to reset your password by following these steps:
- Insert the Windows installation disk into your Dell computer.
- Restart your computer and boot from the installation disk.
- Select your language preferences and click “Next.”
- Click “Repair your computer” > “Troubleshoot” > “Reset this PC.”
- Follow the prompts to reset your Dell computer. You’ll be given the option to keep your personal files or remove everything. Choose the option that works best for you.
- Once the reset is complete, you’ll be able to create a new password for your Dell computer.
Dealing with Residual Power
When you encounter power issues with your Dell computer, one of the first things to consider is residual power.
This is the power that remains in your computer even after you have shut it down.
If residual power is not drained, it can cause your computer to malfunction or not turn on at all.
Here are some steps to help you deal with residual power:
- Perform a hard reset: This is the first step to take when dealing with residual power. Press and hold the power button for 15 to 20 seconds. This will help to drain the residual power from your computer.
- Disconnect the AC adapter and battery: If you are using a laptop, disconnect the AC adapter and remove the battery. If you are using a desktop, disconnect the power cable. This will help to ensure that there is no power going into your computer.
- Wait for a few minutes: After disconnecting the power source, wait for a few minutes to ensure that all residual power is drained from your computer.
- Reconnect the power source: After a few minutes, reconnect the AC adapter and battery (for laptops) or power cable (for desktops).
- Turn on your computer: Once you have reconnected the power source, turn on your computer and check if the power issue has been resolved.
It is important to note that residual power can also be drained by removing the battery and holding down the power button for a few seconds.
However, this may not be possible with some laptops that have non-removable batteries.
In such cases, performing a hard reset is the best option.
Using Recovery Media
If you have created a recovery media, you can use it to reset your Dell computer to factory settings.
Recovery media can be a CD/DVD or a USB drive with at least 32 GB of storage.
To use recovery media, follow these steps:
- Insert the recovery media into your computer’s CD/DVD drive or USB port.
- Restart your computer and press F12 repeatedly to access the boot menu.
- Use the arrow keys to select the option to boot from the CD/DVD or USB drive.
- Follow the on-screen instructions to reset your computer to factory settings.
Note that using recovery media will erase all data on your computer and restore it to the original factory settings.
Therefore, it is important to backup any important files before using recovery media.
Creating a recovery media is easy and can be done using the built-in Windows feature.
To create a recovery media, follow these steps:
- Click the Start button and type “create a recovery drive” in the search bar.
- Select the option to create a recovery drive and follow the on-screen instructions.
- Choose your USB drive as the location to save the recovery media.
It is important to keep the recovery media in a safe place. In case of a system failure, you can use the recovery media to restore your computer to its original state.
Resetting a Cloud-Based Dell Computer
If you have a Dell computer that is cloud-based, resetting it can be a bit different than resetting a traditional PC.
However, the process is still simple and straightforward.
Here are the steps you need to follow:
- First, make sure your computer is connected to the internet. Since your computer is cloud-based, this is essential for the reset process to work.
- Next, go to the Dell Support website and download the SupportAssist OS Recovery tool. This tool will help you reset your computer to its factory settings.
- Once you have downloaded the tool, run it and follow the on-screen instructions. You will need to enter your Dell Service Tag or Express Service Code to confirm that you have a compatible device.
- After you have confirmed your device, the SupportAssist OS Recovery tool will guide you through the reset process. This may take some time, so be patient and do not interrupt the process.
- Once the reset process is complete, your computer will be restored to its factory settings. You can now set up your computer again and start using it as if it were new.
It’s important to note that resetting a cloud-based Dell computer will erase all of your data and settings.
Therefore, it’s essential to back up your files before you begin the reset process.
You can use cloud storage services like Dropbox or Google Drive to back up your files.
Comparing Dell’s Reset Process with Other Brands
When it comes to resetting your computer, Dell has a simple and straightforward process that is easy to follow.
However, it’s always good to know how other brands compare.
Here’s a quick comparison between Dell, HP, and Lenovo.
Dell
Dell’s reset process involves using the Dell SupportAssist OS Recovery tool.
This tool allows you to reset your computer to its factory state, erasing all data and restoring the operating system to its original state.
The process is easy to follow and can be completed in just a few steps.
HP
HP also has a reset process that is similar to Dell’s.
The HP Recovery Manager tool allows you to reset your computer to its factory state, erasing all data and restoring the operating system to its original state.
However, some users have reported issues with the tool, such as it not working properly or taking a long time to complete.
Lenovo
Lenovo’s reset process is a bit different from Dell and HP.
Lenovo computers come with a built-in OneKey Recovery tool that allows you to create a backup of your system and restore it to its original state if needed.
However, this tool is not as user-friendly as Dell’s or HP’s, and some users have reported issues with it not working properly.
Key Takeaways
Resetting a Dell computer can be a simple process, but it’s important to take the necessary steps to ensure that you don’t lose any important data or settings.
Here are some key takeaways to keep in mind when resetting your Dell computer:
- Back up your important data: Before resetting your Dell computer, it’s important to back up any important files or data that you don’t want to lose. You can use an external hard drive or cloud storage service to store your data.
- Choose the right reset option: Dell computers offer a few different reset options, including a factory reset and a Windows reset. Make sure you choose the option that best suits your needs and goals.
- Follow the reset instructions carefully: When resetting your Dell computer, it’s important to follow the instructions carefully to avoid any issues or errors. Make sure you have a stable internet connection and enough power to complete the reset process.
- Be patient: Resetting a Dell computer can take some time, especially if you’re performing a full factory reset. Be patient and allow the process to complete without interrupting it.
- Seek help if needed: If you encounter any issues or errors during the reset process, don’t hesitate to seek help from Dell support or a professional technician.
By following these key takeaways, you can reset your Dell computer with confidence and ease.
Remember to always back up your important data and follow the instructions carefully to ensure a successful reset.