


Screen recording on an iPhone 7 has become an essential tool for many users, whether it’s for personal or professional purposes.
It allows you to easily capture anything happening on your device’s screen, including video calls, gameplay, or even step-by-step tutorials.
If you’re curious about how to do this on your iPhone 7, then you’re in the right place.
In this article, we’ll guide you through the process of screen recording to help you make the most of this useful feature.
First, it’s important to know that screen recording is a built-in feature on the iPhone 7, meaning you don’t need to download any additional apps.
Before you start recording, however, you’ll need to enable the feature in your settings, which we’ll explain in detail further along.
Once it’s enabled, you’ll be able to access the screen recording function from your iPhone’s Control Center, making the process simple and intuitive.
So, sit back, relax, and get ready to learn how to screen record on iPhone 7.
By the end of this guide, you’ll be equipped with all the knowledge you need to capture and share your screen recordings with ease.
Post Contents
Basic Requirements for Screen Recording
Screen recording on your iPhone can be useful for various reasons like capturing your gameplay, creating tutorials, or recording video calls.
Before diving into the method for recording a screen, let’s discuss the basic requirements for screen recording on the iPhone 7 and other Apple devices.
iOS 11 or Later
To successfully record the screen on the iPhone, the device must be running on iOS 11 or later.
The screen recording feature was introduced in iOS 11, which means if your iPhone 7 is running on iOS 10 or older, you’ll need to update your device to a newer version of iOS.
Navigating to Settings > General > Software Update will help you verify if your device has the latest iOS version and receive any available updates.
Supported Devices
Screen recording is available on all iPhone, iPad, and iPod touch devices running iOS 11 or later.
The list of supported devices includes:
- iPhone: iPhone 7, iPhone 7 Plus, iPhone 8, iPhone 8 Plus, iPhone X, iPhone XR, iPhone XS, iPhone XS Max, iPhone 11, iPhone 11 Pro, iPhone 11 Pro Max, iPhone SE (2nd Generation), iPhone 12, iPhone 12 Mini, iPhone 12 Pro, iPhone 12 Pro Max, and iPhone 13 series
iPad: iPad (5th generation) and later, iPad Pro (All models), iPad Air 2 and later, iPad Mini 4 and later
- iPod touch: iPod touch (7th generation)
Keep in mind that iPhone 6 and older models are not compatible with iOS 11 or later, so they cannot access the screen recording feature.
The same applies to older versions of iPad and the iPod touch, which do not support the minimum iOS requirement.
Now that we’ve covered the basic requirements, make sure your Apple device meets these criteria before you start screen recording your desired content.
Your iPhone 7 or any other supported device should be all set up and ready to record your screen with iOS 11 or later.
How to Screen Record on iPhone 7
Accessing the Settings App
To start, you’ll need to access the Settings app on your iPhone 7.
Locate the gear-shaped icon on your device and tap it to open the Settings menu.
Once you’re in the Settings app, you will see a variety of options available to customize your iPhone experience.
Adding Screen Recording to Control Center
Follow these steps to add the Screen Recording feature to your Control Center:

- Scroll down until you find the “Control Center” option and tap on it to access the settings.
- In the Control Center settings, you will see a list of available controls. Locate “Screen Recording” in the list.

- If “Screen Recording” is not already in the “Included Controls” section, tap the green “+” icon next to it to add it to your Control Center.

Now, you have successfully enabled the Screen Recording feature on your iPhone 7.
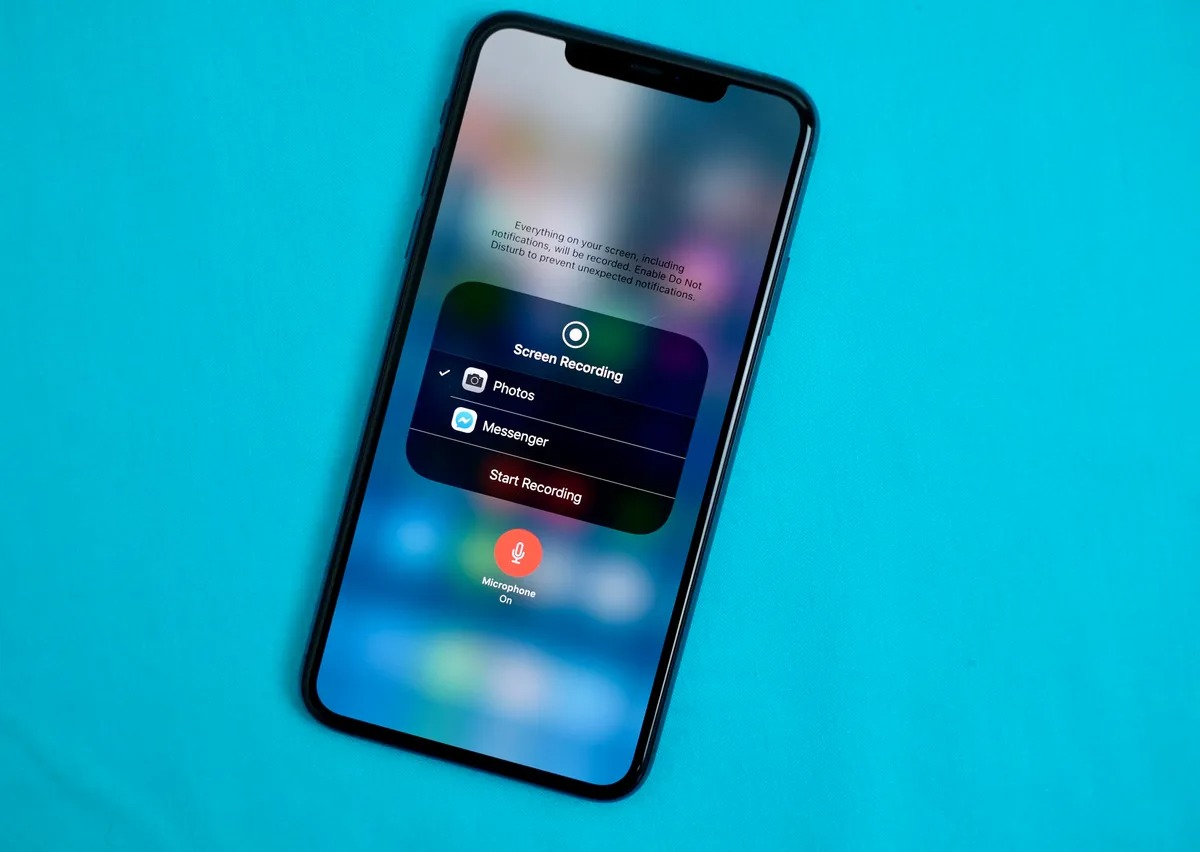
The next time you want to record your screen, simply swipe up from the bottom of your screen to reveal the Control Center and tap the Screen Recording button.

A three-second countdown will begin, and then your screen recording will start.
To stop recording, swipe up and open the Control Center again, then tap the red Screen Recording button or the red status bar at the top of the screen.
Your recorded video will be saved in the Photos app for easy viewing and sharing.
Starting and Stopping Screen Recordings
Accessing the Control Center
Before you can start screen recording on your iPhone 7, you need to access the Control Center.
To do this, swipe up from the bottom of the screen.
If you don’t see the screen recording button, you must enable it in the settings:
- Open Settings
- Choose Control Center
- Tap Customize Controls
- Tap the green
+next to Screen Recording
Now, the screen recording button will be available in the Control Center.
Using the Record Button
To start a screen recording, follow these steps:
- Swipe up from the bottom of the screen to open the Control Center
- Tap the Screen Recording button
Once you tap the button, there will be a three-second countdown before the recording begins.
While recording, a red status bar will appear at the top of your screen.
To stop the recording:
- Open the Control Center
- Tap the red Record button, or
- Tap the red status bar at the top of your screen and tap Stop
Your screen recording will be saved in the Photos app.
Customizing Audio Settings
By default, screen recordings on the iPhone 7 will not record audio from the built-in microphone.
If you want to include sound in your recording, you can customize the audio settings:
- Open the Control Center
- Press and hold the Screen Recording button
- Tap the Microphone icon to turn it on (it should turn red)
Now, your screen recording will capture audio from your device’s microphone.
Keep in mind that some apps may not allow you to record audio or video.
Additionally, you cannot use screen mirroring and screen recording simultaneously on iOS.
Viewing and Editing Recorded Videos
After you’ve successfully completed a screen recording on your iPhone 7, you may want to view and edit the captured video.
Here are some tips on finding and editing your recorded videos using the Photos App and built-in editing tools.
Finding Videos in the Photos App
To locate your screen-recorded videos, follow these steps:
- Open the Photos App on your iPhone 7.
- Tap on the Albums tab at the bottom of the screen.
- Scroll down and select the Screen Recordings album.
In this album, you’ll find all your screen recordings, separated from your regular videos and photos. You can now view or edit them as needed.
Editing Tools Available
The Photos App on your iPhone 7 comes with editing tools that allow you to trim, crop, and add filters to your videos.
Here’s how you can use these editing tools:
Trimming:
- Select the screen recording you want to edit from the Screen Recordings album.
- Tap the Edit button in the top right corner.
- Move the yellow handles at the beginning and end of the video timeline to trim your video. You’ll see a preview of your changes in real-time.
- Tap Done to save your changes.
Cropping and Rotating:
- While in the Edit mode, tap the Crop/Rotate icon at the bottom of the screen.
- Use the corner handles to crop your video, and the rotation wheel to rotate it to the desired angle.
- Tap Done to save your changes.
Adding Filters:
- In the Edit mode, tap the Filters icon at the bottom of the screen.
- Swipe left or right on the carousel of filters to preview and select one that suits your video.
- Adjust the filter intensity using the slider beneath the filter preview.
- Tap Done to apply the filter and save your changes.
By utilizing these editing tools available in the Photos App, you can enhance your screen-recorded videos on your iPhone 7, making them more appealing and polished.
Troubleshooting Issues
Common Problems
Sometimes, screen recording on iPhone 7 may not work as expected.
Here are a few common problems that you may face and their potential solutions:
- Screen Recording not working: First, make sure Screen Recording is enabled in the Control Center. Go to Settings → Control Center, and tap the + icon next to Screen Recording. If it’s already enabled, try force restarting your device to fix any technical glitches.
Screen recording without audio: To ensure that audio is recorded during screen recording, long-press the screen recording button in the Control Center, and make sure the Microphone is turned on.
Screen recording stops automatically: This may be due to storage limitations on your device. Check your available storage in Settings → General → iPhone Storage, and free up some space if necessary.
Updating Your iOS

Occasionally, screen recording problems might be due to an outdated iOS version.
Updating your iPhone 7 to the latest iOS can help fix any bugs or incompatibilities.
Here’s how to do it:
- Make sure your iPhone is connected to Wi-Fi and has enough battery life.
- Go to Settings → General → Software Update.
- If there’s an update available, tap “Download and Install.”
Updating to iOS 11 or later versions is recommended for iPhone 7 users.
Newer iOS versions often include bug fixes and improvements that can help improve your screen recording experience.
Remember to keep your iPhone updated to ensure smooth performance and to avoid issues with screen recording or other features.
Keep your troubleshooting efforts brief, and don’t be afraid to reach out to Apple Support if the problem persists.
 6")