


Learning how to save streams on Twitch can help you level up your content production significantly.
The competition is strong, so you must keep your Twitch channel and social media profiles up to date if you want to stay relevant and gain more viewers and subscribers.
But it is not like you always have the time or the energy to create content that your audience will appreciate.
You have other commitments. Accidents happen. Creators have days when they just want to chill.
The solution?
Save your streams and repost them to your YouTube channel and social media accounts so more people can see them.
You can also break them into bites if you want to have a month’s worth of content with little effort.
You can have over 10 videos that can keep your online profiles up to date for days from a 10-minute stream.
Very efficient, isn’t it?
You can also monetize them. For sure, the thought of earning more money from a single content sounds exciting to you.
Read on to learn how to save streams on Twitch!
Post Contents
- 1 How to Save Streams on Twitch
- 1.1 1. Enable Store Past Broadcasts in Your Twitch Account’s Settings
- 1.2 2. Turn Them Into Highlights If You Want to Save Streams on Twitch for as Long as You Want
- 1.3 3. Download Your Twitch Streams From the VOD Storage to Your Device
- 1.4 4. Use a Third-party Downloader to Save Streams in Your Local Storage
- 2 In Conclusion
How to Save Streams on Twitch
All your streams on Twitch will automatically be saved in your VOD folder as a Twitch VOD (Video On Demand), but only for a limited time.
If you are a standard Twitch user, your Twitch VODs will stay on your account for 14 days.
It will become 60 days if you are a Twitch partner, if you subscribe to Twitch Turbo, or if you become a member of Amazon Prime.
But regardless of the type of account you have, your VODs will not stay on the platform for as long as you want.
Your past broadcasts will be deleted after the 14th or 60th day, and the worst thing that you can do as a creator is to not save them before they are gone.
Here is how to save streams on Twitch.
1. Enable Store Past Broadcasts in Your Twitch Account’s Settings
If you want to save your streams in your Twitch account’s storage because you want to save the chat messages and others, here are the steps:
- Go to your account’s settings, which you can access by clicking Creator Dashboard when you click your profile icon in the top-right corner.
- In Channel and Videos tab, enable Store Past Broadcasts. It is under VOD Settings.
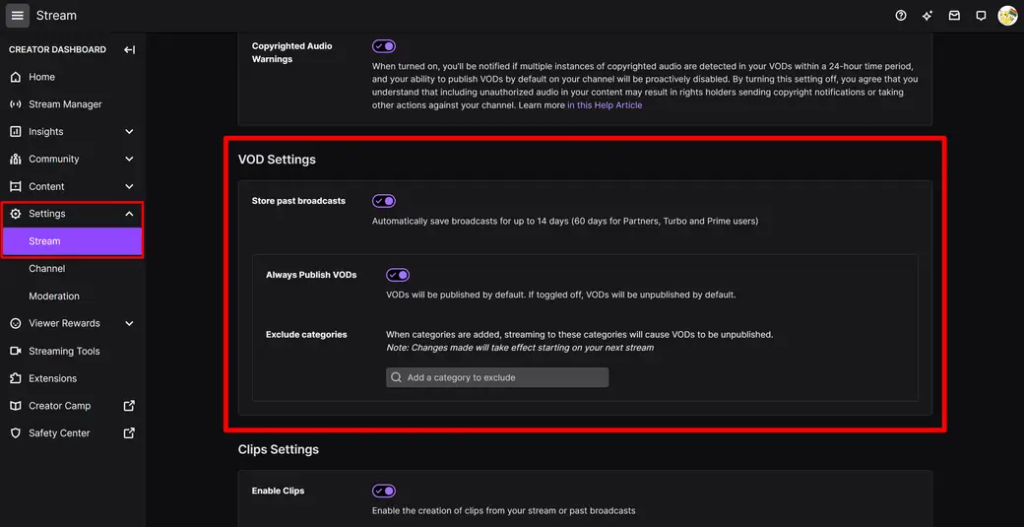
This is the easiest way to save your past broadcasts but not the best if you want them saved for months.
As mentioned earlier, Twitch VODs are stored on the platform only for 14 days or 60 days depending on your account.
2. Turn Them Into Highlights If You Want to Save Streams on Twitch for as Long as You Want
Twitch VODs have a lifespan of 2 to 9 weeks, but that rule applies only to those streams that were not turned into highlights.
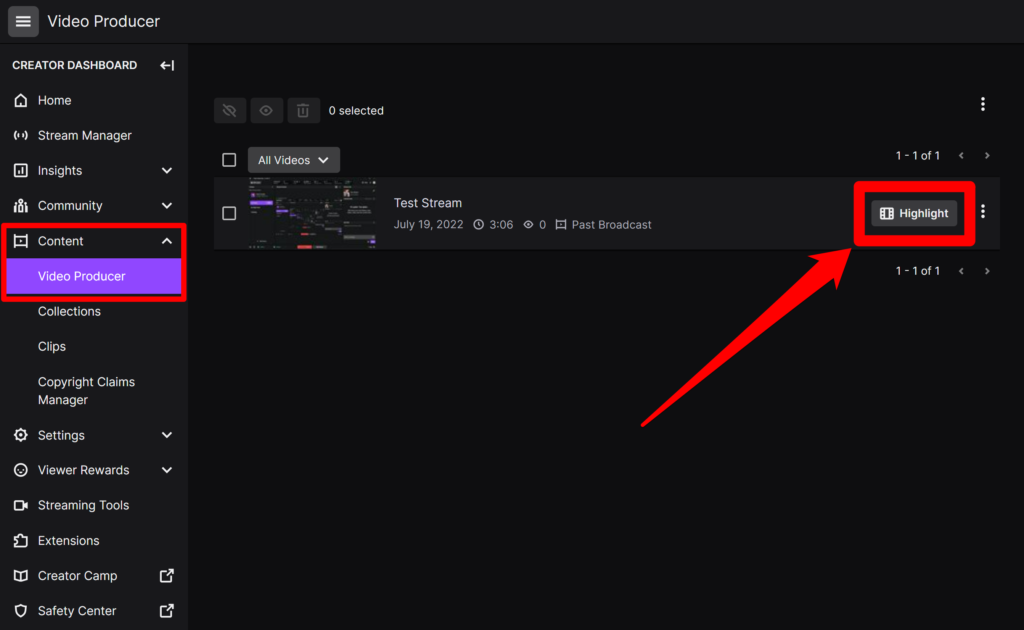
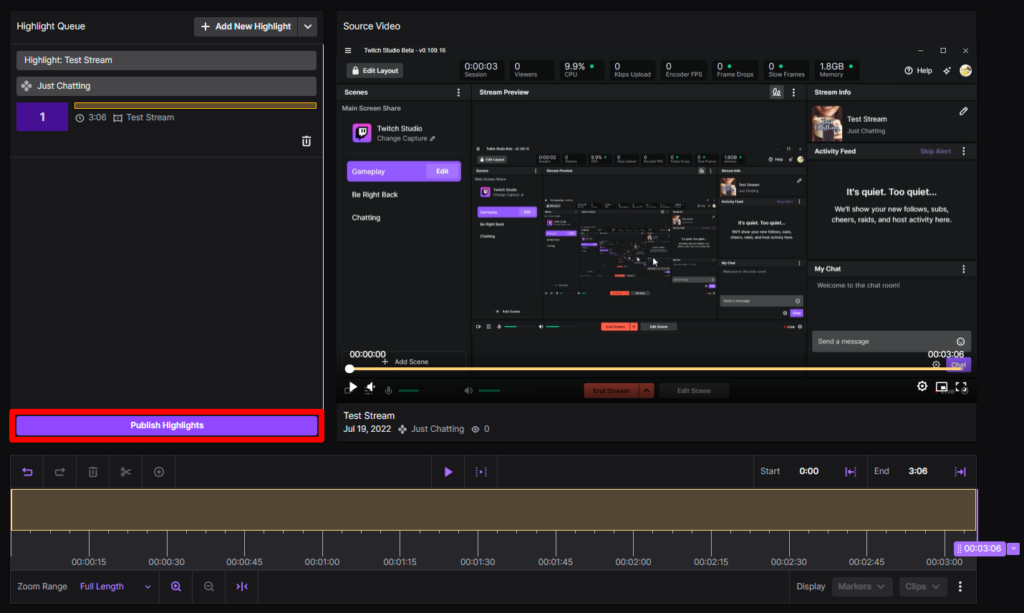
There is a way to keep your Twitch VODs for as long as you want. Here are the steps:
- Go to the Content section in your Creator Dashboard, and then click Video Producer.
- You will be directed to a page where you will see your past streams. Find the stream you want to turn into a highlight, and then click Highlight.
- You can turn the whole video into a highlight, but you can also choose specific parts.
- Click Publish Highlights when you are done.
Note that the past broadcasts must be stored in your VOD storage before you can save them as highlights.
Refer to the first method to know how to save past broadcasts.
3. Download Your Twitch Streams From the VOD Storage to Your Device
Twitch allows its users to download their VODs and save them in their local storage.
If you want to post your past streams to other platforms such as YouTube and social media sites, you need to download them from Twitch.
- In Creator Dashboard, go to Content and then click Video Producer.
- Click the three dots icon on the right side of the video you want to download, and then click Download.
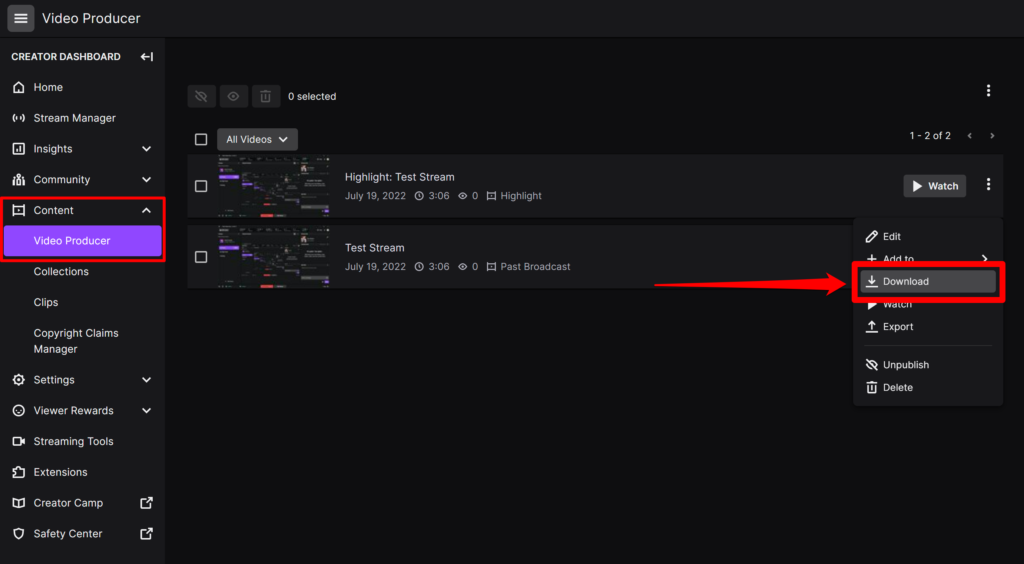
If the video is long, it may take a while for Twitch to prepare it for download.
You also need to make sure that there is enough storage space in your device to make the download successful.
Once you have downloaded it, you can now post it to other platforms.
You can post it as is, but you can also edit it beforehand so your audience will not get bored.
4. Use a Third-party Downloader to Save Streams in Your Local Storage
If you don’t want to download your VODs using the method above, you can use a third-party VOD downloader.
There are different types of VOD downloaders available. You could use a computer program or install a browser extension.
Just make sure that it is safe to use.
In Conclusion
No matter how much you love being a content creator, there will come a time when it will burn you out.
This is why you need to learn how to save streams on Twitch either in your VOD storage or your local storage.
Even though new content keeps your audience engaged, there is nothing wrong with recycling past content to keep your profiles up to date.
Content repurposing is a strategy that works for growing an audience because you can attract different types of people with it.
Your main platform may be Twitch, but your audience will be slow to grow if you don’t step outside of that platform and post your content where more people can see them.
Not all internet users use Twitch. Some of them are on YouTube, Facebook, Twitter, and other platforms most of the time.
You will not be able to reach those people if you are not there.
Apart from that, focusing on one platform will also limit your earning potential.
You can monetize content on almost all online platforms, not just on Twitch.
Indeed, knowing how to save streams on Twitch can level up your content production and help you accumulate more wealth!