


If you’re looking to upgrade your home’s thermostat, the Nest thermostat is a great option to consider.
Not only is it sleek and modern in design, but it also has a number of features that can help you save money on your energy bills.
However, before you can start enjoying its benefits, you’ll need to know how to install nest thermostat.
The good news is that installing a Nest thermostat is a fairly straightforward process, and you can do it yourself with just a few tools and some basic knowledge.
In this article, we’ll walk you through the steps you need to take to install your Nest thermostat, from checking your system compatibility to connecting it to your Wi-Fi network.
Whether you’re a seasoned DIYer or you’re new to home improvement projects, installing a Nest thermostat is a manageable task that can be completed in just a few hours.
By the end of this article, you’ll have all the information you need to get your Nest thermostat up and running, so you can start enjoying its energy-saving benefits right away.
Post Contents
How to Install Nest Thermostat
If you’re considering installing a Nest thermostat, the first thing you need to do is check whether it’s compatible with your current HVAC system.
Fortunately, Nest provides an interactive tool to help you determine compatibility. Here’s how to use it:
- Visit the Nest website and navigate to the compatibility checker tool.
- Select your current thermostat’s wiring configuration from the list of options. If you’re not sure what your wiring configuration is, you can refer to your current thermostat’s manual or consult an HVAC professional.
- Answer a few questions about your HVAC system, such as whether you have a heat pump or central air conditioning.
- The tool will then tell you whether your system is compatible with Nest and which Nest thermostat models will work with your system.
If the compatibility checker indicates that your system is not compatible with Nest, you may need to make some changes to your HVAC system before you can install a Nest thermostat.
In this case, it’s best to consult an HVAC professional to ensure that any modifications are made safely and correctly.
It’s also worth noting that while Nest thermostats are designed to work with most HVAC systems, there are some systems that are not compatible.
For example, if you have a high-voltage system, such as baseboard heating, you will need to use a different type of thermostat.
By checking your compatibility before purchasing and installing a Nest thermostat, you can avoid any potential issues and ensure that your new thermostat will work properly with your HVAC system.
Gathering Tools and Materials
Before you begin installing your Nest thermostat, it’s important to gather all the necessary tools and materials. Here’s what you’ll need:
- A Nest thermostat
- A screwdriver
- Wall anchors and screws (if needed)
- A level
- A pencil
- A drill (if needed)
- A smartphone or tablet with the Nest app installed
Make sure you have all the tools and materials before you start the installation process. This will help you avoid any unnecessary delays or trips to the hardware store.
If your existing thermostat is wired, you’ll also need to turn off the power to your HVAC system before you begin. You can do this by turning off the breaker that controls your HVAC system.
Once you have all the tools and materials you need, you’re ready to move on to the next step of the installation process.
Removing Old Thermostat
Turning off Power
The first step in removing your old thermostat is to turn off power to your HVAC system.
This will prevent any electrical accidents from occurring during the installation process.
Locate the circuit breaker that controls your HVAC system and turn it off.
Removing Thermostat Cover
Once the power is turned off, remove the cover of your old thermostat.
You may need to use a screwdriver to remove any screws holding the cover in place. Be sure to keep any screws in a safe place so you don’t lose them.
Labeling Wires
Before removing any wires, label them with the corresponding letter or number on your oldthermostat.
This will make it easier to install your new Nest thermostat later on. If your old thermostat doesn’t have labels, you can use masking tape and a pen to label the wires.
Removing Wires
Once you have labeled the wires, gently pull them out of their terminals.
If they are stuck, you may need to use a pair of needle-nose pliers to remove them. Be sure to keep the wires separated and organized so you don’t mix them up later on.
After you have removed all of the wires, you can remove the old thermostat from the wall.
If it is attached with screws, use a screwdriver to remove them. If it is attached with adhesive, gently pry it off the wall.
Now that you have successfully removed your old thermostat, you are ready to install your new Nest thermostat.
Follow the next section of this guide to complete the installation process.
Installing Nest Base
Installing the Nest Base is an important step in setting up your Nest Thermostat. Follow these sub-sections to complete the installation process:
Mounting Base Plate
Before mounting the base plate, ensure that the power to your heating and cooling system is turned off. Then, follow these steps:
- Hold the base plate against the wall where you want to install the Nest Thermostat.
- Use a level to ensure that the base plate is straight.
- Mark the two screw holes on the wall.
- Drill the holes and insert the screws into the wall.
Connecting Wires
Once the base plate is mounted, it’s time to connect the wires. Here’s how to do it:
| Wire Label | Connection |
|---|---|
| Rh or Rc | Connect to the red wire. |
| W | Connect to the white wire. |
| Y | Connect to the yellow wire. |
| G | Connect to the green wire. |
Attaching Nest Base
After the wires are connected, attach the Nest Base to the base plate. Follow these steps:
- Line up the connectors on the Nest Base with the pins on the base plate.
- Push the Nest Base onto the base plate.
- Use the screws provided to secure the Nest Base to the base plate.
Once the Nest Base is attached, turn the power to your heating and cooling system back on.
The Nest Thermostat will begin the setup process and guide you through the rest of the installation.
Connecting Nest Display
Attaching Display
To attach the Nest display, line up the small rectangular connector on the back of the display with the port on the base plate.
Then, push it onto the base until there is an audible click. The Nest display should turn on once it is securely attached.
Connecting to Wi-Fi
After attaching the Nest display, you’ll need to connect it to your Wi-Fi network.
To do this, follow these steps:
1. Tap the “Settings” icon on the Nest display.
2. Select “Wi-Fi” and then “Add Network.”
3. Enter your Wi-Fi network name and password.
4. The Nest display will then attempt to connect to your Wi-Fi network.
Once it is connected, you’ll see a checkmark next to your network name.
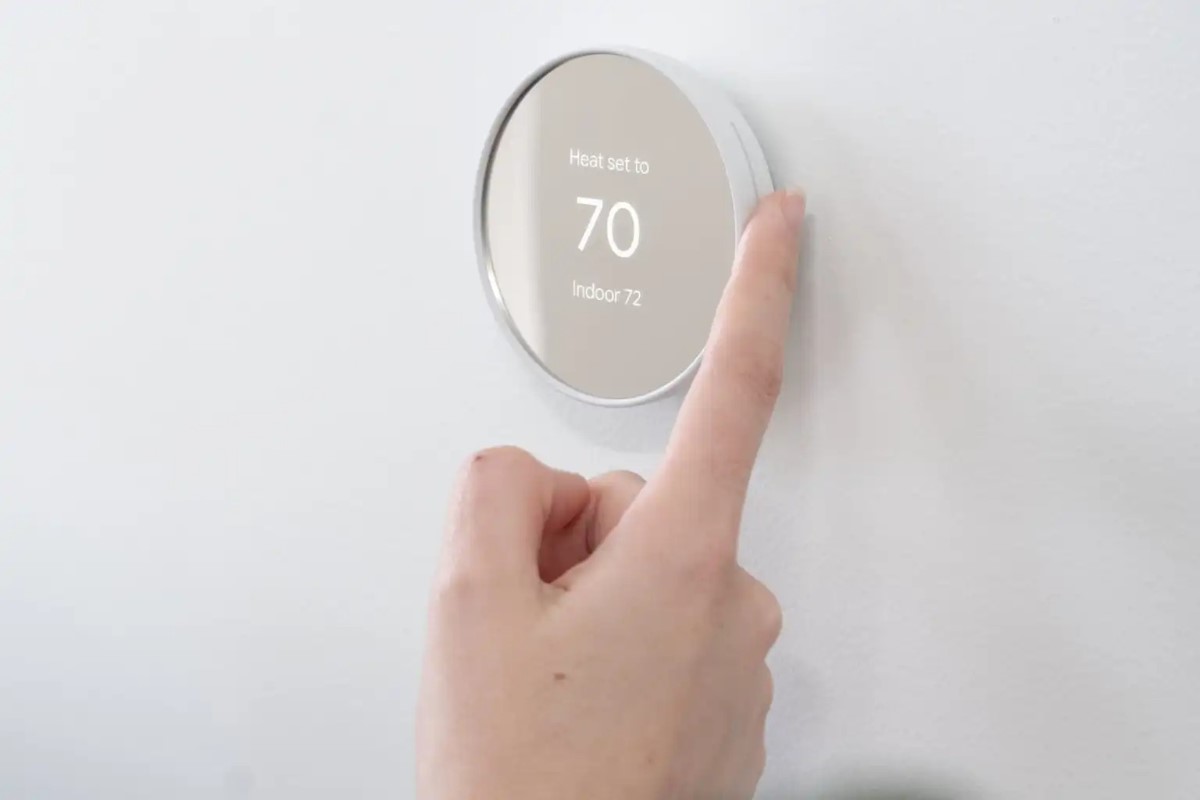
Testing Nest Thermostat
Once you’ve attached the Nest display and connected it to your Wi-Fi network, it’s time to test your Nest thermostat.
Here’s how:
1. Set your desired temperature using the Nest display or the Nest app on your phone.
2. Wait a few minutes for the Nest thermostat to adjust the temperature.
3. Check to see if the temperature in your home has changed to your desired temperature.
4. If the temperature hasn’t changed, check the Nest display for any error messages or alerts.
You may need to troubleshoot the issue before the Nest thermostat will work properly.
That’s it!
You’ve successfully connected your Nest display and tested your Nest thermostat.
Enjoy the convenience of a smart thermostat that learns your habits and saves you money on energy bills.
Key Takeaways
Installing a Nest thermostat can be a great way to improve your home’s energy efficiency and save money on your utility bills.
Here are the key takeaways to keep in mind when installing your Nest thermostat:
- Before you begin, make sure you have all the necessary tools and equipment, including a screwdriver, drill, level, and wire strippers.
- Follow the step-by-step instructions provided by Nest to install and set up your thermostat.
- Be sure to turn off the power to your HVAC system before beginning any installation work.
- Take care when handling the wires and make sure they are properly connected to the Nest base plate.
- Use the Nest app to configure your thermostat settings and set up a schedule that works for your lifestyle.
- Consider using additional Nest products, such as the Nest Temperature Sensor, to further optimize your home’s energy efficiency.
- If you run into any issues during the installation process, consult the Nest support website or contact customer service for assistance.
By following these key takeaways, you can ensure a successful installation and enjoy the benefits of a more energy-efficient home with your new Nest thermostat.
 1")