


Are you tired of using the same old thumbnail for your YouTube videos?
Do you want to know how to change thumbnail on Youtube to something more eye-catching and appealing?
Look no further, because in this article, we’ll show you how to change the thumbnail on YouTube in just a few simple steps.
Changing the thumbnail on YouTube is an important aspect of video optimization.
A good thumbnail can attract more viewers and increase engagement with your content.
YouTube offers several options for changing your video’s thumbnail, including using an auto-generated thumbnail or uploading a custom thumbnail.
In this article, we’ll cover both options and help you choose the best thumbnail for your video.
So, let’s get started and learn how to change the thumbnail on YouTube!
Post Contents
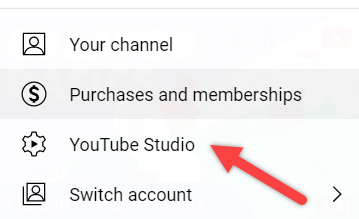
Accessing Your YouTube Channel
If you want to change the thumbnail of your YouTube video, you need to access your YouTube channel.
Here are the steps to do that:
Logging In
The first step is to log in to your YouTube account. You can do this by following these steps:
- Go to www.youtube.com.
- Click the ‘Sign In’ button at the top right corner of the page.
- Enter your email address and password.
- Click the ‘Sign In’ button.
If you have a Google account, you can use it to sign in to YouTube. If you don’t have a Google account, you can create one for free.
Once you have logged in to your YouTube account, you can access your channel and change the thumbnail of your video.
In the next section, we will discuss how to navigate to your YouTube channel.
How to Change Thumbnail on Youtube
If you’ve uploaded a video to YouTube and want to change its thumbnail, it’s a pretty simple process. Here’s how to do it:
Locating the Video
First, you need to locate the video you want to edit. To do this, go to your YouTube Studio dashboard and select “Content” from the left-hand menu.
This will show you a list of all the videos you’ve uploaded.
Editing the Video Information
Once you’ve located the video you want to edit, click on it to bring up the video details page.
Here, you’ll see all the information about your video, including its title, description, and tags.
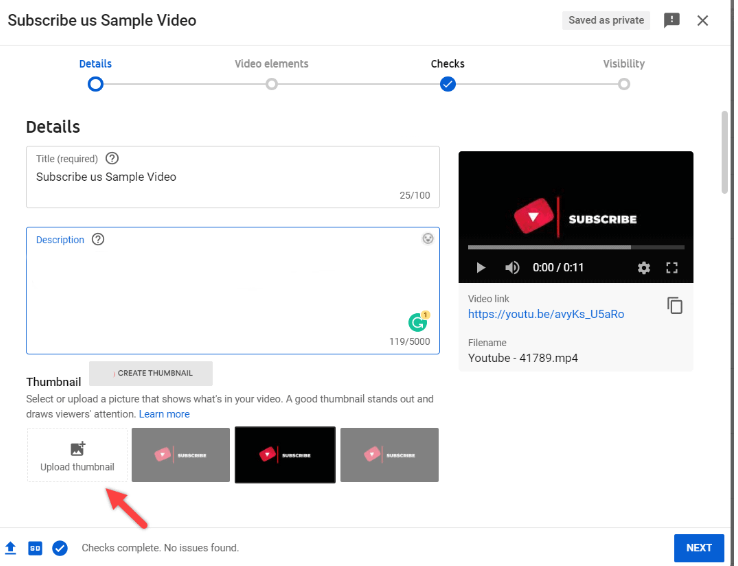
You’ll also see a section labeled “Thumbnails.”
To change the thumbnail, click on the “Thumbnails” section.
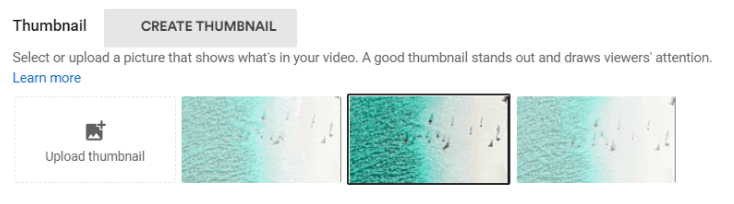
You’ll be given the option to choose from three auto-generated thumbnails or to upload a custom thumbnail.
Uploading a Custom Thumbnail
To upload a custom thumbnail, click on the “Upload thumbnail” button.
This will allow you to select an image file from your computer.
Once you’ve selected the file, click “Open” to upload it.
It’s important to note that YouTube has specific guidelines for custom thumbnails.
The file should be less than 2 MB in size and have a resolution of 1280 x 720 pixels.
Additionally, the image should be in either JPG, GIF, BMP, or PNG format.
Once you’ve uploaded your custom thumbnail, click “Save” to save your changes.
Your new thumbnail will be displayed on your video’s details page and in search results.
That’s it!
Changing the thumbnail on an existing video is a quick and easy process that can help improve the visibility and appeal of your content.
Tips for Choosing the Right Thumbnail
When it comes to creating a YouTube video, selecting the right thumbnail is just as important as creating high-quality content.
Your thumbnail is the first thing viewers see when browsing through videos, and it can make or break whether they decide to click on your video or not.
Here are some tips to help you choose the right thumbnail for your video.
Make it Relevant
Your thumbnail should accurately represent what your video is about. It should give viewers an idea of what they can expect to see in your video.
If your thumbnail is misleading, viewers may click on your video, only to be disappointed when it doesn’t meet their expectations.
So, make sure your thumbnail is relevant to your video content.
Make it Eye-Catching
Your thumbnail should also be eye-catching and visually appealing. It should stand out from other videos in the search results and grab viewers’ attention. Use bright colors, bold text, and high-quality images to make your thumbnail pop.
However, be careful not to make it too cluttered or busy, as this can be overwhelming and turn viewers away.
Keep it Simple
While you want your thumbnail to be eye-catching, you also want to keep it simple.
Avoid using too much text or too many images in your thumbnail. Keep it clean and easy to read.
Remember, your thumbnail should be a visual representation of your video, not a mini infographic.
In summary, when choosing a thumbnail for your YouTube video, make sure it’s relevant, eye-catching, and simple.
By following these tips, you can create a thumbnail that will attract viewers and encourage them to click on your video.
Uploading a Video
When you’re ready to upload a video to YouTube, you can do so by following a few simple steps.
Here’s what you need to do.
Selecting a Video to Upload
First, you’ll need to choose the video you want to upload.
This can be a video you’ve already created, or a new video you’re making specifically for YouTube.
To select a video to upload, click on the camera icon in the top right corner of the YouTube homepage.
From there, you can either drag and drop your video file into the upload box, or you can click on the box to browse your files and select the video you want to upload.
Adding a Custom Thumbnail
Once you’ve selected your video, you’ll be taken to the upload page.
Here, you can add a title, description, and tags for your video, as well as choose a custom thumbnail.
To add a custom thumbnail, click on the “Custom thumbnail” button on the right-hand side of the page.
From there, you can either choose one of the auto-generated thumbnails that YouTube suggests, or you can upload your own custom thumbnail.
When choosing a custom thumbnail, keep in mind that it should be eye-catching and relevant to your video.
YouTube recommends using an image with a resolution of 1280 x 720 pixels, and a file size of less than 2MB.
Once you’ve chosen your custom thumbnail, click on the “Save” button to save your changes.
That’s it! Your video is now uploaded to YouTube and ready to be shared with the world.
Key Takeaways
Changing the thumbnail of your YouTube video can be a quick and easy way to attract more viewers and improve the overall look of your channel.
Here are some key takeaways to keep in mind when changing your YouTube thumbnail:
- Custom thumbnails are an excellent way to make your videos stand out from the crowd. By creating your own thumbnail, you can showcase the most important aspects of your video and entice viewers to click and watch.
- YouTube offers a variety of tools to help you create custom thumbnails, including the ability to add text, borders, and icons. You can also use free graphic design tools like Canva to create a custom thumbnail that perfectly matches your video’s content.
- When choosing a thumbnail, make sure it accurately reflects the content of your video. Avoid using misleading or clickbait-style thumbnails, as this can damage your channel’s reputation and lead to lower engagement over time.
- If you’re not happy with your current thumbnail, you can easily change it at any time by accessing the “Thumbnail” section of your video editor in YouTube Studio. You can choose from a selection of auto-generated thumbnails or upload your own custom thumbnail.
- Finally, remember that your thumbnail is just one small part of your overall video strategy. Make sure you’re creating high-quality content that is engaging, informative, and valuable to your viewers. With the right combination of content and visuals, you can build a loyal following on YouTube and grow your channel over time.